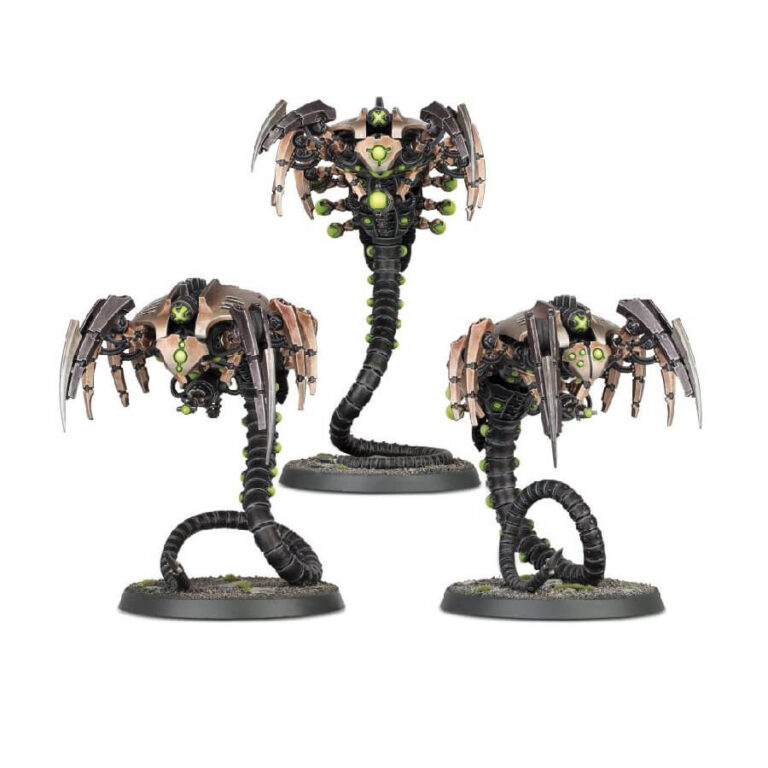
In the slumbering expanse of a Tomb World, the vigilant Necron sentinels known as Canoptek Wraiths come to life. These ethereal entities glide noiselessly through the ancient corridors, assuming the roles of both watchful eyes and attentive ears. Their purpose is twofold: they patrol with unwavering diligence, safeguarding against potential intruders, while meticulously assessing the condition of systems for any signs of deterioration. Among their most remarkable attributes lies their dimensional destabilisation matrix – a quantum marvel enabling them to seamlessly phase in and out of reality.
Originally conceived to mend solid machinery by reaching into its inner workings, the dimensional destabilisation matrix has evolved into a prized asset in confrontations against intruders. This matrix empowers a Canoptek Wraith to transiently immerse its claws and tendrils within an opponent, rapidly solidifying them to sever arteries, disable nerve clusters, and sever vital pathways without leaving any external trace.
What’s in the Canoptek Wraiths box
- x135 plastic components with which to build 3 Necron Canoptek Wraiths.
- x3 Citadel 50mm Round bases.
How to paint the Canoptek Wraiths set
- Step 1: Basecoating in Abaddon Black
Begin by dipping your basecoat brush into Abaddon Black paint. Apply this dark basecoat to the Canoptek Wraiths’ metallic areas, such as limbs, blades, and other details. Make sure to cover the surface evenly. - Step 2: Accentuate with Leadbelcher
Switch to your fine detail brush and use Leadbelcher paint to accentuate details. Carefully apply this metallic paint to the metallic parts of your Wraiths, highlighting edges and raised surfaces for depth. - Step 3: Eerie Green Glow
Using a green paint like Moot Green and a fine detail brush, paint the details on the body and the eyes. This contrast against the dark and metallic parts will give your Wraiths an otherworldly appearance. - Step 4: Creating Shadows
Use a shade wash paint like Nuln Oil and a wash brush. Apply the wash to the recesses between metallic parts and dark sections. This adds depth and realism to your miniatures. - Step 5: Base Texture and Color
Prepare the base using texture paint like Stirland Mud for a desolate look. Once dry, paint the base with an earthy tone like Rhinox Hide to match the Tomb World theme. - Step 6: Intricate Details and Effects
Now, let’s focus on those captivating details. For an extra touch, you can:
Use Balthasar Gold to highlight and embellish decorative elements. These areas will catch the light, adding visual interest to your miniatures.
Consider adding battle damage effects, like small chips of paint to simulate wear and tear on the Wraiths’ armor.
Experiment with Tesseract Glow for a mystical effect on specific parts, like the energy sources.
Create the illusion of blood on their blades using a deep red paint, such as Khorne Red. Apply sparingly for a gruesome battle-worn appearance - Step 7: Varnishing
For protection and enhancement, apply Ardcoat varnish. Ensure the miniature is fully dry before varnishing to avoid smudging or uneven finish.

