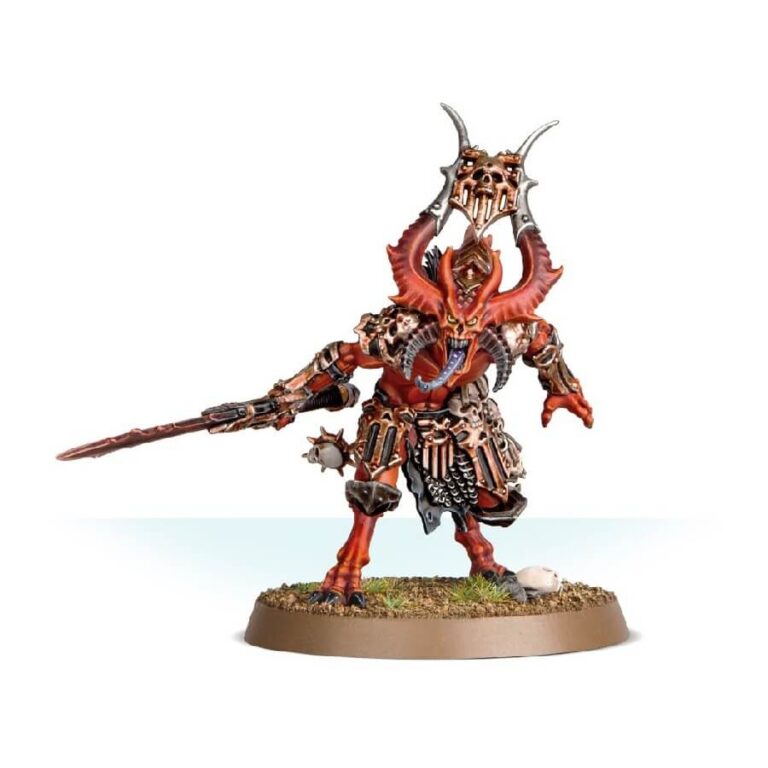
With every lethal strike, the Bloodmaster unleashes devastation upon his enemies, severing heads and cleaving bodies, while his mere presence incites a frenzy within the Bloodletters of Khorne. A vital addition to any Khorne army, be it in the 41st Millennium or the Mortal Realms, these champions of the Blood God not only excel in combat but also enhance the ferocity of your Bloodletters through their potent aura abilities.
This comprehensive set equips you with all the necessary components to construct your own formidable Bloodmaster. Resembling the Bloodletters he commands, yet distinguished by his larger stature and enhanced armor, he embodies the perfect frontline warrior for your army, ready to unleash havoc upon your foes.
Also available in this box:
What’s in the Bloodmaster, Herald of Khorne box
- x14 plastic components that allow you to assemble your Bloodmaster model. These components are intricately designed to capture the brutal essence of the Bloodmaster and ensure a detailed and visually striking miniature.
- x1 40mm round base which serves as the foundation for your Bloodmaster model. This base not only provides stability but also offers ample space for you to add additional details or basing materials to further enhance the visual appeal of your miniature.
How to paint the Bloodmaster, Herald of Khorne set
- Step 1: Basecoat the Model
Apply a basecoat of a vibrant red color, such as Mephiston Red, to the entire model. Ensure smooth and even coverage, as this will serve as the foundation for the subsequent layers of paint. - Step 2: Highlight the Armor
Using a lighter red shade, like Evil Sunz Scarlet, carefully apply highlights to the raised areas of the Bloodmaster’s armor. This will add depth and definition to the model. - Step 3: Paint the Metallic Parts
Paint the metallic elements, such as the weapon blades and armor trim, with a metallic silver paint like Leadbelcher. Apply multiple thin layers for a smooth and metallic finish. - Step 4: Add Details and Accents
Using contrasting colors, pick out the smaller details on the model, such as the horns, teeth, and eyes. For example, you can paint the horns with a bone color like Zandri Dust and the eyes with a bright yellow, such as Averland Sunset. - Step 5: Shade the Model
Apply a wash, such as Agrax Earthshade, to the entire model to add depth and shadows. Ensure the wash settles into the recesses, emphasizing the intricate details. - Step 6: Highlight the Metallic Parts
Using a fine detail brush, carefully apply a lighter metallic color, like Stormhost Silver, to the edges and raised areas of the metallic parts. This will create a shiny and reflective effect. - Step 7: Paint the Base
Finish the model by painting the base. Use earthy tones for a cohesive look, such as Dryad Bark for the ground and a mix of greens for the grass. Add additional details like rocks, skulls, or blood effects to enhance the theme. - Step 8: Varnish the Model
To protect your paintwork, apply a layer of varnish. Use a matte varnish for a natural finish or a gloss varnish for a more vibrant and shiny appearance, depending on your preference.

