The Orders Militant of the Adepta Sororitas stand as the Emperor’s sacred wrath, their Battle Sisters wielding a divine arsenal to purge the galaxy’s foes. These paragons of piety exemplify the Emperor’s defiance and his unyielding shield against chaos, with each victory spreading his celestial light further across the battlefield.
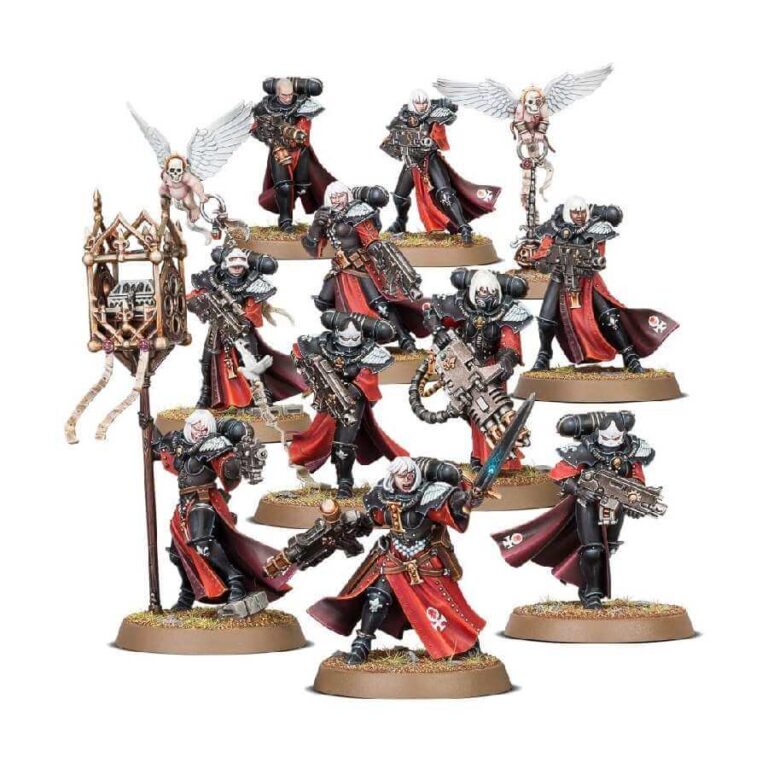
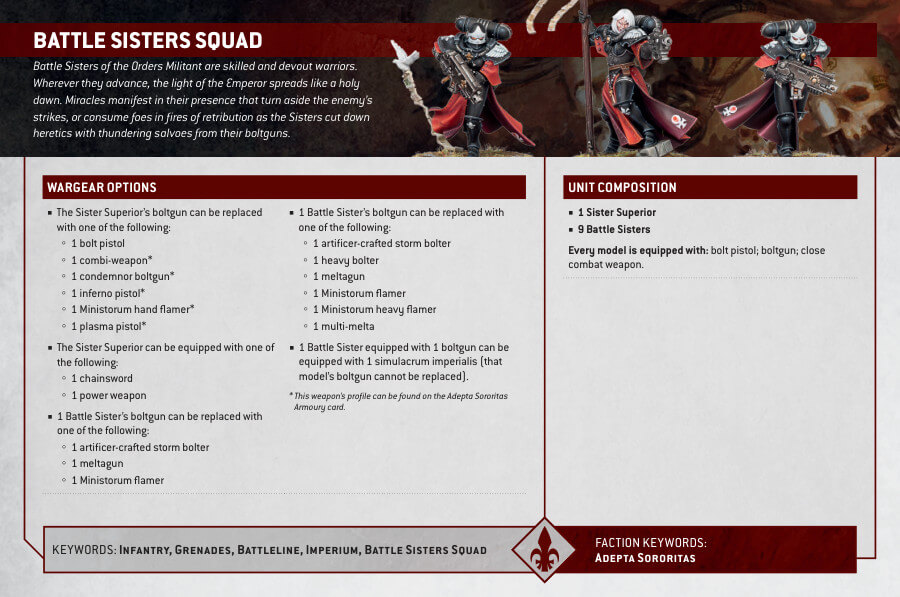
This multipart kit allows for the creation of the Adepta Sororitas’ core units, complete with an Incensor Cherub to accompany their holy march. The Battle Sisters are the embodiment of the Emperor’s martial might, equipped with boltguns and the option for special or heavy weaponry, symbolizing their versatile battlefield roles.
In addition, the box set includes options for a Sister Superior to lead, brandishing a chainsword or power sword and various ranged weapons, embodying the strategic diversity of the Adepta Sororitas. Customize a Battle Sister with the Simulacrum Imperialis, representing their unwavering faith and the miracles it can invoke.
Explore the Adepta Sororitas miniatures page for more on their lore, unit roles, and the sacred duty they fulfill within the Warhammer 40,000 universe. Each figure in this set is not just a model but a piece of the storied history, ready to enact the Emperor’s will on the galactic stage.
Battle Sisters Squad Datasheets
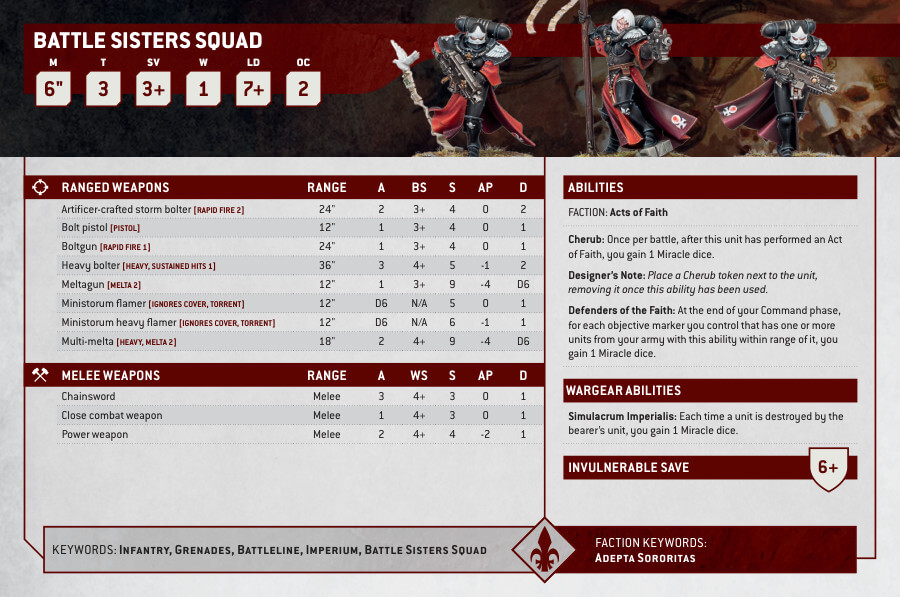
What’s in the Battle Sisters Squad box
This kit contains x179 plastic components that make a Battle Sisters Squad:
- x10 Battle Sisters
- x10 Citadel 32mm Round Bases
- x1 Citadel 25mm Round Base
- x1 Adepta Sororitas Transfer Sheet is also included
How to paint the Battle Sisters Squad Set
- Step 1: Prepare the Miniatures
Before you begin painting, clean the miniatures with warm, soapy water to remove any residue. Use a hobby knife or file to smooth out any mold lines or imperfections. Once cleaned, assemble the miniatures according to the instructions provided in the kit. - Step 2: Prime the Miniatures
Apply a thin, even coat of primer to the miniatures using either a spray primer or brush-on primer. Make sure to choose a primer that is suitable for your chosen type of paint. Allow the primer to dry completely before proceeding to the next step. - Step 3: Basecoat the Armor
Using Celestra Grey paint, apply a basecoat to the armor plates of the Battle Sisters. Apply thin layers of paint, building up the color gradually for smooth and even coverage. Take your time and ensure each coat is fully dry before applying the next. - Step 4: Paint the Details
Using Retributor Armour, paint the metallic elements of the miniatures. This includes weapons, armor accents, and any other metallic parts. Apply the paint carefully and with attention to detail, ensuring a clean and neat finish. - Step 5: Highlight and Shade
To add depth and dimension to the miniatures, apply highlights and shades. For lighter areas, use lighter shades of the base colors, and for shaded areas, use darker tones. Apply these highlights and shades selectively to create contrast and bring out the details. - Step 6: Paint the Faces
Use a flesh-toned paint, such as Kislev Flesh, to paint the faces of the Battle Sisters. Be sure to paint eyes, lips, and any other facial features with care and precision. You can use a fine-tipped brush or a magnifying glass if needed. - Step 7: Add Details and Accents
Paint additional details such as purity seals, icons, and squad markings using appropriate colors. You can also add weathering effects or battle damage if desired. - Step 8: Varnish the Miniatures
Once you are satisfied with the paint job, apply a coat of varnish to protect the miniatures and give them a finished look. Choose a varnish suitable for your paint type (matte, satin, or gloss) and follow the instructions on the varnish product.

