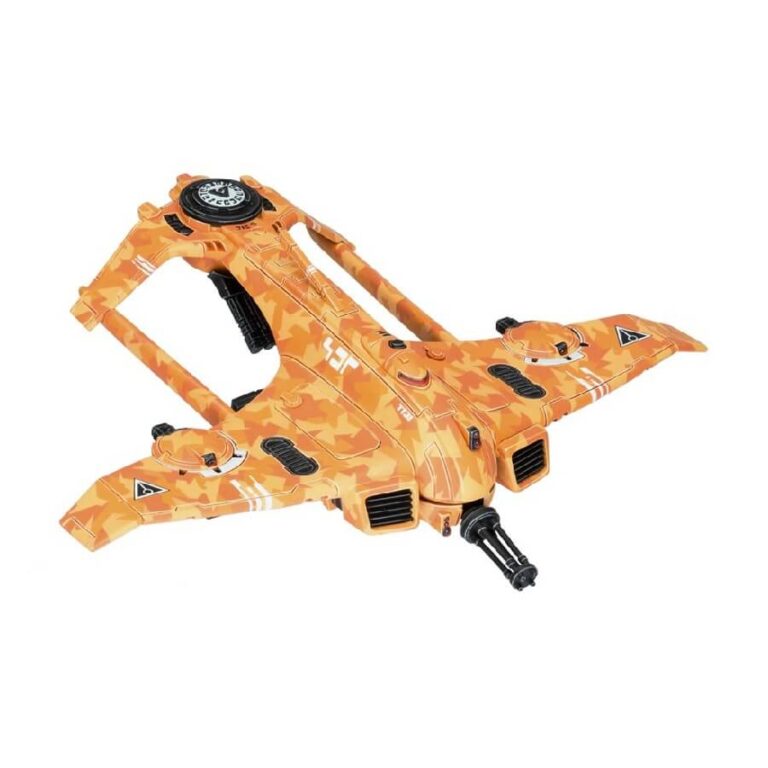
The Razorshark Strike Fighter distinguishes itself from its counterparts by forgoing an Interceptor Drone in favor of enhanced maneuverability, achieved through the incorporation of additional thrusters. Moreover, it sets itself apart with a fearsome quad ion turret, replacing the conventional pulse bomb generator, further elevating its offensive capabilities.
Taking a closer look at the Razorshark Strike Fighter kit, you’ll be captivated by the remarkable craftsmanship that showcases the essence of T’au design brilliance. The front wingtips and stabilizers are distinctly tilted downwards, harmoniously connected to frame the imposing quad ion turret at the center. The model is adorned with exquisite Air caste insignia sculpted on top, and an array of intricate metal panels, grills, and twin engines flanking the nose, adding depth and realism to its appearance. Not to mention, meticulous attention to detail brings forth the inclusion of lights and an aerial, truly exemplifying the dedication to creating a stunning miniature.
When it comes to armaments, the Razorshark Strike Fighter offers a diverse range of options, giving you the freedom to tailor your aircraft to your tactical preferences. Alongside the fearsome quad ion turret, you have the choice of a twin-linked ion rifle, burst cannon, missile pod, networked markerlight, and seeker missiles. Additionally, the model features two Interceptor Drones that can be docked within the wings, ready to provide support and protection, but also easily disconnected if the situation demands.
The Razorshark Strike Fighter is not just a miniature, it’s an embodiment of the T’au’s engineering prowess and dedication to technological innovation. With its sleek design and lethal capabilities, this aircraft stands as a testament to the might of the T’au forces.
What’s in the AX3 Razorshark Strike Fighter box
- x51 plastic components that make a Sun Shark Bomber or a Razorshark Strike Fighter.
- x1 T’au transfer sheet.
How to paint the AX3 Razorshark Strike Fighter set
- Step 1: Prime Your Model
Before you start painting the AX3 Razorshark Strike Fighter, make sure to prime it with a suitable primer. This will help the paint adhere better to the surface and provide a smoother finish. - Step 2: Base Coat
Begin by applying the base coat to the AX3 Razorshark Strike Fighter using XV-88. Use a medium-sized brush and carefully paint the entire model with this color. - Step 3: Camouflage Pattern
After the XV-88 base coat is dry, create a modern camouflage pattern using a mix of Tau Light Ochre and Ungor Flesh. Use a fine brush and carefully paint irregular shapes and patches on the model to achieve the camouflage effect. The mix of these two colors will give a warm, earthy tone to the pattern. - Step 4: Shade
Once the camouflage pattern is dry, apply a shade using Agrax Earthshade. Use a medium-sized brush and apply the shade to the recessed areas and panel lines. This will add depth and definition to the camouflage pattern and enhance the details of the AX3 Razorshark Strike Fighter. - Step 5: Details
Focus on the smaller details of the AX3 Razorshark Strike Fighter, such as the vents and guns. Use a fine brush and Abaddon Black to carefully paint these areas. Take your time to ensure clean and precise application, as these details will stand out against the camouflage background. - Step 6: Highlights
For the final touch, use White Scar to highlight certain areas of the AX3 Razorshark Strike Fighter, such as the wings and body. Use a fine brush and add small, controlled strokes to create a sense of dimension and highlight the edges. This will give the model a sharp and eye-catching appearance. - Step 7: Painting the Base
Now, let’s paint the base of the AX3 Razorshark Strike Fighter. Use Stirland Mud for the ground texture and Steel Legion Drab for any additional elements like rocks or debris. You can also add some drybrushing with Karak Stone to bring out texture and details on the base. - Step 8: Varnish for Protection
To protect your hard work and enhance the durability of the paint job, apply a varnish to the AX3 Razorshark Strike Fighter. Choose between matte or gloss varnish, depending on your preference for the final look of the model. Apply the varnish in thin, even coats, and let it dry completely before handling the miniature.

