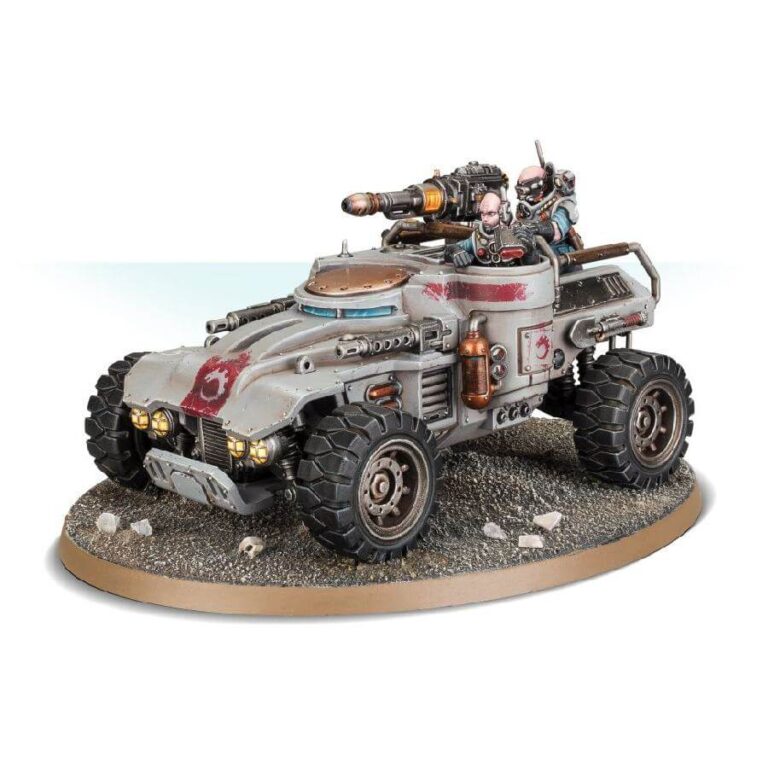
Venture into the treacherous frontiers with the Achilles Ridgerunners, versatile vehicles operated by vigilant pilots who scour for valuable resource deposits and relay their findings to headquarters. Beyond their prowess in thwarting enemy scouts, the true essence of the Achilles Ridgerunner lies in its role as an advanced scout, preemptively identifying ambush sites and pathways for the cult’s main forces to infiltrate enemy territory.
These agile Achilles Ridgerunners serve as rapid buggies with exceptional carrying capacity for ordnance. Furthermore, they play a pivotal support role alongside units of Atalan Jackals, amplifying their mobility and tactical edge. Outfitted with dual heavy stubbers, they can be armed with a heavy mining laser, heavy mortar, or missile launcher, making them a versatile asset for Genestealer Cults players, equipping them with a versatile toolkit to effectively engage a wide array of adversaries.
What’s in the Achilles Ridgerunner box
- x73 plastic components that make one Achilles Ridgerunner armed with two heavy stubbers, and a choice of either a heavy mining laser, a heavy mortar, or a missile launcher. It also comes with a host of other options and optional wargear.
- x1 Citadel 120mm oval base.
How to paint the Achilles Ridgerunner set
- Step 1: Base Colors
Start by painting the main body of the Achilles Ridgerunner using Leadbelcher, a metallic paint that gives it a strong framework. - Step 2: Detailing and Accentuating
Highlight smaller details like rivets and trims using Abaddon Black for a striking contrast or Mephiston Red to add bold accents. - Step 3: Wheels and Treads
Paint the wheels and treads using Abaddon Black for the treads and Mechanicus Standard Grey for the wheels to create a balanced contrast. - Step 4: Armament
Paint the weaponry using Stormhost Silver for the barrels and Khorne Red for other weapon components, offering distinct functionalities. - Step 5: Support Systems
Emphasize additional support systems with Runelord Brass or Balthasar Gold, harmonizing with the main theme while adding depth. - Step 6: Crew and Interior
For crew members, use Rakarth Flesh for a natural look. Enhance interior details with Mournfang Brown for contrasts. - Step 7: Weathering (Optional)
For weathered effects, apply subtle streaks using Rhinox Hide or create chipping with Typhus Corrosion to simulate wear and tear. - Step 8: Final Touches
Personalize the model with Citadel decals and insignias. Use a fine brush to neatly apply these details, elevating the overall appearance. - Step 9: Varnish for Protection
After painting, safeguard your work with Ardcoat, a protective Citadel varnish, ensuring longevity.

