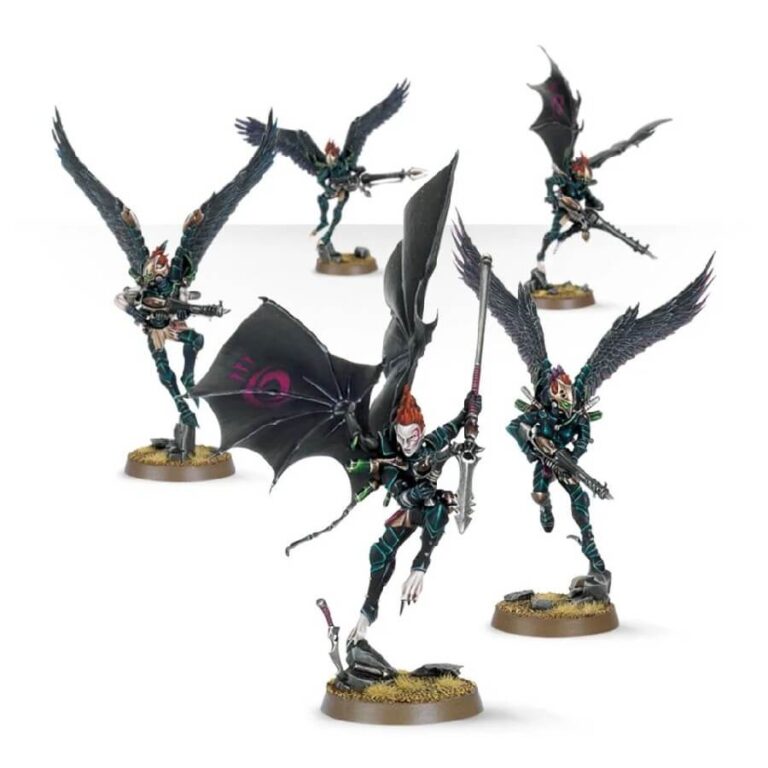
The Kabal overlords, recognizing the immense value of these veteran fighters, generously compensate the Scourges for their loyalty and service. As a result, these elite warriors spare no expense when it comes to equipping themselves. They seek out the finest weaponry and armor available, ensuring they are always prepared for the deadliest of engagements.
However, it is a rare sight to witness a Scourge engaging the enemy in close combat. Their preferred approach is to remain at a distance, unleashing a relentless onslaught of firepower upon their foes. With their aerial advantage, they rain down a withering hail of bullets, lasers, and other deadly projectiles. Swiftly, they retreat to the skies, beyond the enemy’s reach, avoiding direct confrontation and ensuring their own safety.
The Scourges epitomize the cunning and calculated nature of the Drukhari. Their extravagant enhancements and strategic combat style make them formidable adversaries on the battlefield. They strike from above, leaving devastation in their wake, a testament to their lethal prowess and unwavering dedication to the Kabal’s cause. The Scourges stand as a testament to the innovative and ruthless spirit that defines the Drukhari, a force to be reckoned with in the war-torn realms of Warhammer 40,000.
What’s in the Scourges box
- x80 plastic components that make 5 Drukhari Scourges. The set also includes plenty of weapon upgrades in the form of a shredder, splinter cannon, haywire blaster, heat lance, blaster and a dark lance. There are also several weapon options should you wish to upgrade one of the Scourges into a Solarite to lead the unit.
- x5 Citadel 32mm Round bases.
How to paint the Scourges set
- Step 1: Prime Your Model
Start by applying a thin, even coat of Chaos Black Primer to your Scourges. This will create a smooth surface for painting and help the paint adhere better. Let the primer dry completely before moving on. - Step 2: Basecoat the Armor
Use a brush to apply the base color to the armor plates of the Scourges. For example, you can use Abaddon Black or Mechanicus Standard Grey. Apply the basecoat evenly, ensuring all the details are covered. Let the paint dry before proceeding. - Step 3: Highlight the Armor
Choose a lighter shade of the base color and use a smaller brush to highlight the raised areas of the armor. This will add depth and make the details pop. For example, you can use Eshin Grey as a highlight if you started with Abaddon Black, or Administratum Grey if you started with Mechanicus Standard Grey. Apply the highlight paint sparingly for a subtle effect. - Step 4: Paint the Weapons
Select the appropriate colors for the weapons of the Scourges. Use a fine-tipped brush to carefully paint each weapon, ensuring you stay within the lines. For metallic blades, you can use Leadbelcher as a base and Ironbreaker as a highlight. Experiment with other colors based on your desired look. - Step 5: Detailing
Use a fine-tipped brush to add small details and accents to your Scourges. This can include painting the eyes with Mephiston Red, adding symbols or patterns with White Scar, or enhancing specific features using various paints. Take your time and use a steady hand for precise detailing. - Step 6: Wash the Model
Apply a thin wash of a dark color, such as Nuln Oil, to the entire model. This will settle into the recesses and crevices, adding shading and depth. Use a small brush to carefully apply the wash, ensuring it doesn’t pool in unwanted areas. - Step 7: Base the Model
Consider adding texture to the base of the model to enhance its appearance. You can use Texture paints, such as Armageddon Dust or Astrogranite Debris, to create a realistic base. For added detail, you can incorporate small rocks or debris using Citadel Basing materials. - Step 8: Varnish the Model
To protect your hard work, apply a layer of Munitorum Varnish to the painted model. Varnish comes in different finishes, such as matte or gloss. Choose the finish you prefer and follow the instructions on the varnish can for proper application.

