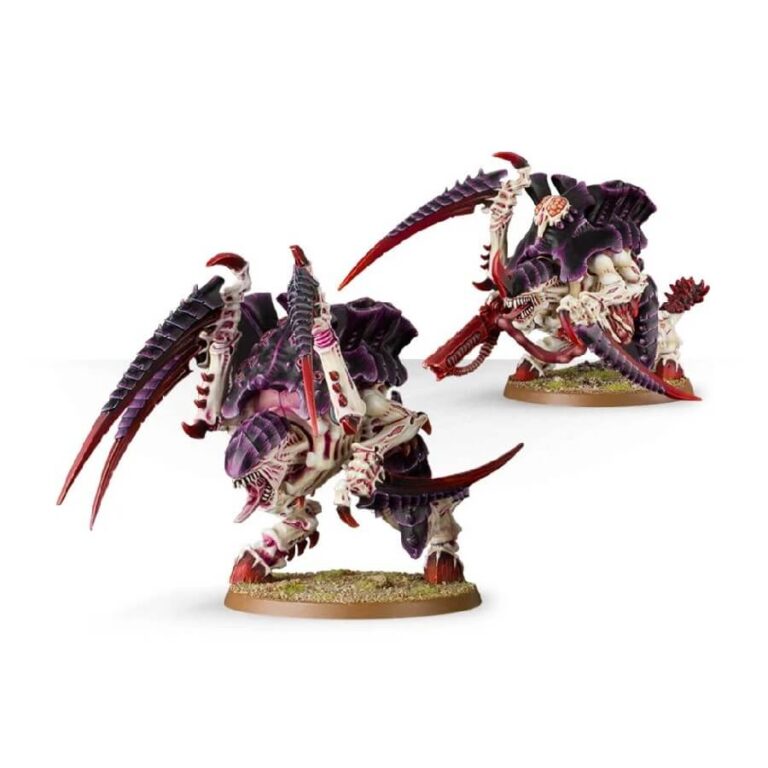
Unleash the unstoppable might of the Carnifex, a towering embodiment of destruction adorned with impenetrable armoured chitin and rippling alien sinew. Renowned as one of the most formidable and resilient warrior creatures within a hive fleet, the Carnifex’s thunderous charges resemble a living battering ram, capable of pulverizing enemies and obliterating obstacles with unparalleled ease.
Immerse yourself in this extraordinary value set that includes two Carnifexes, offering boundless customization opportunities with a range of dynamic poses and versatile weapon options. Each Carnifex is armed with two pairs of scything talons, a pair of crushing claws, a deathspitter, a devourer, a stranglethorn cannon, and a heavy venom cannon. Furthermore, the set presents five alternate heads to personalize your models, while the tail offers the choice of equipping a thresher scythe or a bone mace. For those seeking the pinnacle of legend, the option to construct the renowned Carnifex known as ‘Old One Eye’ is also at your disposal.
What’s in the Carnifex Brood box
- x110 plastic components you can use to make 2 Carnifexes. One of them can also be assembled as Old One Eye’s Brood, a Thornback Brood, a Carnifex Brood or a Screamer-Killer Brood.
- x2 Citadel 105 x 70mm Oval Bases or 60mm Round Bases, depends on how old your box is.
The 60mm bases are discontinued from this set, so if your box is newer, you’re most likely gonna get the oval ones.
How to paint the Carnifex Brood set
- Step 1: Base Coat – Chitin Armor
Start by applying a base coat of purple paint to the Carnifex Brood’s chitin armor. Colors like Naggaroth Night or Xereus Purple work well for this step. Make sure to cover the entire chitinous surface evenly. - Step 2: Layering – Highlighting the Chitin
Using a lighter purple or pinkish color, such as Genestealer Purple or Emperor’s Children, apply thin layers to the raised areas of the chitin armor. This technique will create depth and highlight the texture of the carapace. Gradually build up the layers, focusing on the edges and prominent details. - Step 3: Detailing – Organic Flesh
Paint the exposed organic flesh areas of the Carnifex Brood with a fleshy color. For example, use a color like Bugman’s Glow or Ratskin Flesh. Apply this color to areas such as muscle tissue, tentacles, or exposed limbs. - Step 4: Detailing – Claws and Talons
Paint the claws and talons with a bone-like color. You can use Ushabti Bone or Screaming Skull for this step. Apply the paint carefully to ensure clean and defined claws and talons. - Step 5: Detailing – Eyes and Mouth
Paint the eyes and mouth of the Carnifex Brood with bright, glowing colors to make them stand out. Colors like Yriel Yellow or Mephiston Red work well for this step. Apply these colors with precision to bring life to the model’s face. - Step 6: Wash – Shading and Depth
Apply a wash, such as Druchii Violet or Carroburg Crimson, to the entire model. This will add shading and depth by settling into the recessed areas and emphasizing the details. Ensure that the wash is evenly applied and wipe off any excess to avoid pooling. - Step 7: Highlighting – Final Touches
Using a lighter tone of the respective colors used in previous steps, carefully apply highlights to the raised areas. This will add further dimension and bring out the details. For example, use a lighter purple for the chitin armor, and a brighter color for the eyes and mouth. - Step 8: Optional – Weathering and Effects
If desired, you can add weathering effects to the Carnifex Brood. This can include dry brushing with a lighter color to simulate wear and tear, or using washes to create rust or slime effects. Experiment with techniques like stippling or sponge painting to add additional texture and realism. - Step 9: Varnish
To protect your painted Carnifex Brood and give it a finished look, apply a varnish. Use Stormshield to maintain a natural appearance. Follow the instructions on the varnish product for proper application.

