Prepare to uncover the secrets of the Aeldari Seers who have embraced their psychic potential and transformed into the formidable Warlocks. These extraordinary warriors, once trained as Aspect Warriors, possess an innate aptitude for harnessing destructive psychic powers. United in powerful conclaves, Warlocks combine their eldritch abilities to unleash havoc upon their enemies or lead other Aeldari squads, including the valiant Guardians, from the forefront of battle. Armed with the mighty Runes of Battle, these versatile psykers bolster their warhost, curse their adversaries, and lend their power to their allied Farseers, shaping the destiny of their people.
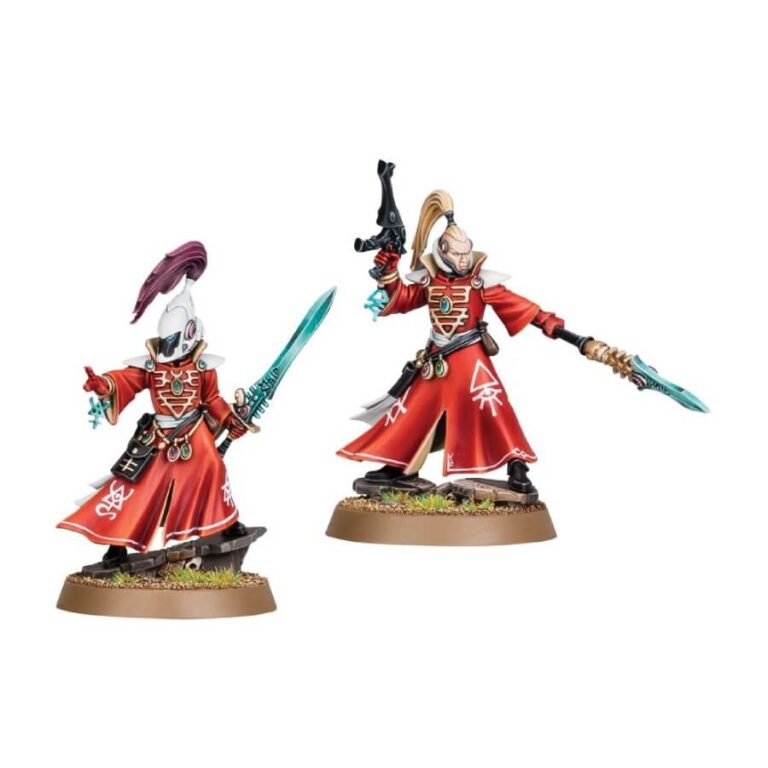
The Warlocks embody the perfect balance of mystic abilities and combat prowess. Their graceful witchblades slice through enemies with deadly precision, while their singing spears discharge bolts of energy that strike with unforgiving force. As versatile psychic warriors, Warlocks have the unique capability to support their allies, unleash devastating curses upon their foes, and enhance the powers of their allied Farseers. They can be seamlessly incorporated into your Aeldari army as individual characters or formed into a cohesive unit of multiple psykers, amplifying their combined might.
This exceptional kit empowers you to assemble two distinct Warlocks, each with their own specialized weaponry. Craft one Warlock wielding an elegant witchblade, a weapon capable of carving through adversaries with swift elegance. Fashion the other Warlock with an energy-infused singing spear, enabling the unleashing of bolts of potent energy upon unsuspecting foes. The kit offers a variety of arm options, allowing for the creation of unique and dynamic poses that reflect the personality and fighting style of each Warlock. Additionally, you have the freedom to choose from two helmeted and two unhelmeted heads, further personalizing the appearance of these remarkable psykers.
What’s in the Warlocks box
- x26 plastic components with which you can make 2 Aeldari Warlocks.
- x2 Citadel 32mm Round Bases.
How to paint the Warlocks set
- Step 1: Base Coat – Robes
Start by applying a solid base coat of red paint to the Warlocks’ robes. Use a red paint like Mephiston Red or any other red paint you prefer. Ensure that the robes are evenly covered and let them dry completely. - Step 2: Base Coat – Helmet and Exposed Head
Paint one Warlock’s helmet with a white base coat. Use a white paint such as Wrack White or White Scar. Apply an even layer of white paint to the helmet, making sure to cover all areas. For the other Warlock with an exposed head, leave the head without any base coat or paint. - Step 3: Detailing – Aeldari Symbols
Using a fine brush, carefully paint the Aeldari symbols and details on the robes with the white paint you used previously to paint the helmet. Focus on areas where the fabric folds or has intricate patterns. This will add visual interest and make the robes stand out. Take your time to achieve clean and precise lines. - Step 4: Highlighting – Robes
To create depth and dimension, add highlights to the red robes. Mix a small amount of an orange or pink color, such as Wild Rider Red or Emperor’s Children, with the red paint. Apply this mixture to the raised edges and contours of the robes, emphasizing the folds and adding a subtle gradient effect. Blend the highlights with the base coat for a smooth transition. - Step 5: Detailing – Brass/Gold Accents
Using a small brush, carefully paint the brass or gold accents on the Warlocks’ armor or accessories. Choose a metallic paint like Balthasar Gold or Retributor Armor. Apply the metallic color to areas such as belt buckles, armor trim, or weaponry. This will provide a striking contrast to the red robes and add a touch of regal elegance. - Step 6: Detailing – Exposed Head
If you have a Warlock with an exposed head, carefully paint the facial features using appropriate colors. Use flesh-tone paints like Kislev Flesh or Cadian Fleshtone for the skin. Paint the eyes with a dark color, such as black or dark brown, and add a small dot of white for a reflective highlight. - Step 7: Weapon Details
Paint the weapons of the Warlocks using metallic colors. For example, you can use a brass or gold paint for the weapon blades or gun barrels. Apply the metallic paint carefully to ensure clean and well-defined details. - Step 8: Fine Details
Add any additional fine details you desire, such as gemstones or runes, using vibrant colors. Consider using colors like Spiritstone Red, Stormhost Silver, or Runefang Steel. Apply these colors carefully to the designated areas, and consider adding a gloss varnish to make the gemstones appear more realistic and reflective. - Step 9: Base and Basing
For the base, consider using a texture paint that complements the overall color scheme. You can use a neutral or earth-tone color like Stirland Mud or Armageddon Dust. Once the texture paint is dry, you can add additional elements like static grass, rocks, or fallen leaves to enhance the overall look. Paint the base accordingly to match your desired effect. - Step 10: Varnish
To protect your work and give the Warlocks a finished look, apply a varnish. Opt for a matte varnish, like Stormshield, to maintain the vibrant colors and detailed appearance of the miniatures. Follow the instructions on the varnish product for application.

