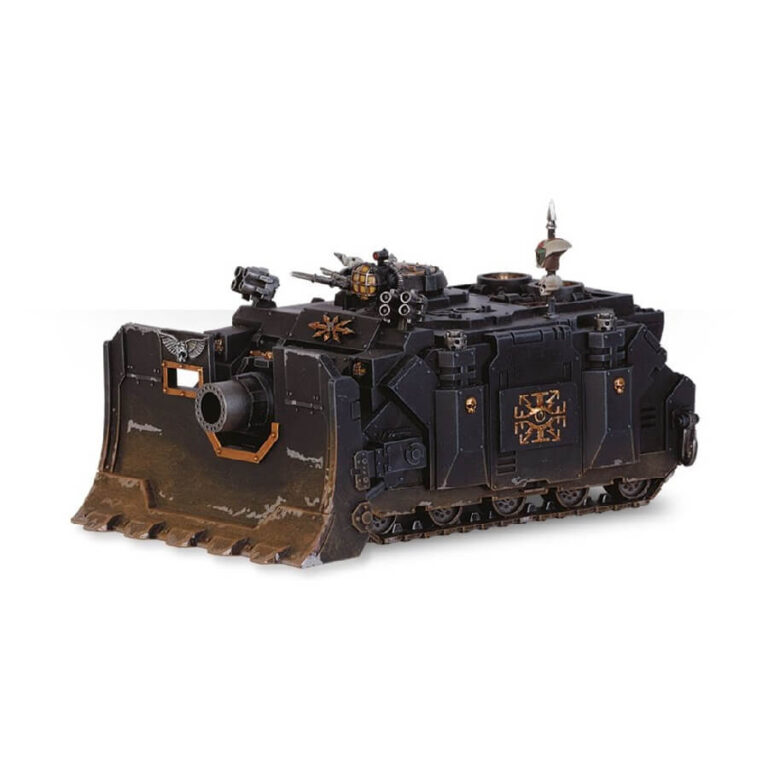
The Vindicator, a formidable vehicle derived from the Rhino Standard Template Construct, represents another impressive addition to the Space Marine arsenal. While sacrificing its transport capacity, the Vindicator compensates by equipping reinforced armor, enhanced internal bracing, and increased ammunition storage. These modifications are essential to accommodate the mighty Demolisher cannon prominently mounted on the front hull, bolstered by robust recoil suppressors.
During the infamous Siege of the Imperial Palace, Chaos Vindicators played a pivotal role, serving as a preferred choice among the Traitor Legions. Over the past ten thousand years, these fearsome war machines have seen extensive service within the Legions and alongside renegade warbands, spanning countless battlefields across the galaxy.
The Vindicator stands as a testament to the enduring legacy of the Space Marines, demonstrating their commitment to adaptability and relentless firepower. Embrace the might of the Vindicator and unleash its devastating capabilities upon your foes. Whether in the service of the Imperium or wielded by those who have forsaken their loyalty, the Vindicator remains an enduring symbol of strength and destruction, ready to leave its indelible mark on the annals of galactic warfare.
What’s in the Chaos Vindicator box
- x118 plastic components that make one Chaos Vindicator, a capable tank, designed specifically to destroy armoured bunkers, buildings and fortresses.
How to paint the Chaos Vindicator set
- Step 1: Priming
Before you begin painting your Chaos Vindicator, make sure it is clean and dry. Apply a coat of primer to the model. A good choice for this would be Chaos Black spray, as it provides a solid base for the paint to adhere to. - Step 2: Base Colors
Start by painting the main body of the Vindicator with a base coat of a metallic color like Leadbelcher. This will give it a rugged and menacing appearance. Use a medium-sized brush to apply the paint evenly, covering all the surfaces. - Step 3: Washes
Apply a wash to the model to add depth and shadows to the crevices and recessed areas. A suitable choice would be Agrax Earthshade. Use a small brush and apply the wash over the metallic areas, allowing it to flow into the details and creating a weathered effect. - Step 4: Highlights
Now it’s time to add some highlights to make the details stand out. Take a lighter metallic color like Ironbreaker and carefully apply it to the raised edges and prominent areas of the Vindicator. This will give it a more pronounced and dynamic look. - Step 5: Accent Colors
Choose accent colors to add more visual interest to your Chaos Vindicator. For example, you can paint the Chaos symbols and icons on the vehicle with a contrasting color like Mephiston Red or Averland Sunset. This will make them stand out and give a touch of chaos to the model. - Step 6: Weathering Effects
To create a battle-worn appearance, consider adding weathering effects. Take a dark brown or black color like Rhinox Hide or Abaddon Black, and with a dry brush, lightly apply it to the edges and corners of the Vindicator. This will simulate dirt and grime, adding realism to the model. - Step 7: Final Details
Now it’s time to add the finishing touches. Paint any additional details like cables, lights, or lenses using appropriate colors. For example, you can use a bright color like Moot Green for the lenses or a metallic color like Balthasar Gold for the lights. Be patient and take your time to ensure clean and precise brushwork. - Step 8: Basing (Optional)
If you want to further enhance the appearance of your Chaos Vindicator, consider adding a base(the model doesn’t come with one). You can use texture paints like Astrogranite or Stirland Mud to create a realistic ground texture. Once dry, paint the base to match your desired environment. You can add grass, rocks, or other scenic elements to complete the look.

