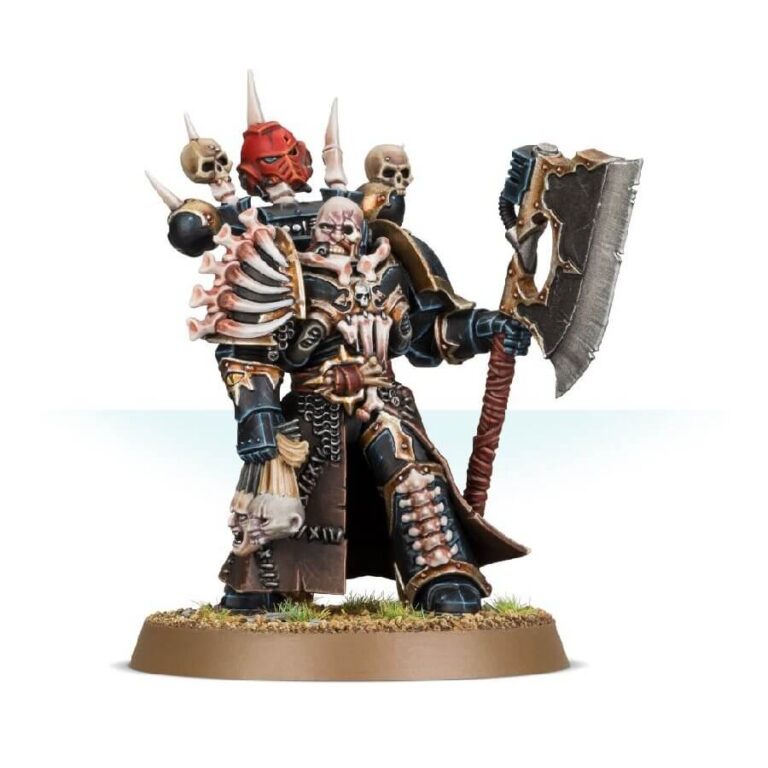
Introducing the relentless and fearsome Masters of Executions, the formidable enforcers and headhunters of Heretic Astartes warbands. With unwavering determination, these single-minded axemen stride towards the battlefield’s most formidable champions and revered leaders. With a thunderous bellow, they deliver a fatal decree before unleashing a relentless assault, cleaving through armor, flesh, and bone with their colossal axes.
True to their macabre nature, the Master of Executions bears the grisly hallmarks of an executioner. Adorned with a trophy rack displaying the spoils of battle and skeletal decorations draped across his armor, he is a haunting embodiment of terror. In his right hand, he tightly clutches a pair of recently-decapitated heads, an eerie testament to his merciless prowess.
This kit also offers a choice of heads, allowing you to customize your Master of Executions according to your vision. Opt for the grim executioner’s hood, shrouding his face in darkness and adding an air of menace. Alternatively, choose the mutilated and skull-faced bare head, revealing the terrifying visage beneath.
What’s in the Master of Executions box
- x9 plastic components that make this miniature.
- x1 Citadel 40mm Round Base.
How to paint the Master of Executions set
- Step 1: Prime the Miniature
Start by priming the Master of Executions using a black or grey spray primer. This will provide a good base for the paint to adhere to and enhance the dark and menacing appearance of the model. - Step 2: Base Colors
Begin by painting the armor with a dark metallic color like Leadbelcher, ensuring full coverage.
Use a deep red shade like Khorne Red to paint any areas that should appear bloody or gory, such as the decapitated heads or decorations.
For the skeletal elements, like the trophy rack and skeletal decorations, use a bone-colored paint like Ushabti Bone. - Step 3: Washes
Apply a wash of a dark shade like Nuln Oil over the metallic areas to add depth and shadow to the armor.
Use a red shade wash like Carroburg Crimson over the areas painted with the deep red shade to create a gruesome and bloody effect.
Apply a wash of a soft shade like Agrax Earthshade over the bone-colored areas to bring out the details and add depth. - Step 4: Highlights
Using a lighter shade than the base color, carefully highlight the edges and raised surfaces of the armor to add definition. For example, you can use a metallic color like Runefang Steel.
Apply a lighter shade to the gory areas to create highlights and add depth to the blood effects. For instance, you can use a brighter red like Evil Sunz Scarlet.
Use a lighter bone color like Screaming Skull to highlight the skeletal elements and bring out the details. - Step 5: Paint the Details
Now it’s time to paint the smaller details on the Master of Executions. Use a fine detail brush to carefully paint areas like the eyes, teeth, and any symbols or emblems on the miniature. For example, you can use Abaddon Black for the eyes, White Scar for the teeth, and Mephiston Red for any symbols or emblems. Choose contrasting colors to make these details stand out. - Step 6: Varnish
To protect your hard work and give the miniature a finished look, apply a coat of varnish. Use a brush or spray-on varnish, following the manufacturer’s instructions. Varnishing not only protects the paint job but also enhances the colors and adds durability to the model. You can use Ardcoat for a glossy finish or Stormshield for a non-reflective, matte finish. - Step 7: Basing (Optional)
To complete the look of your Master of Executions, you may choose to base the miniature. This involves creating a base or diorama-like setting for the model to stand on. You can use materials like textured paint, sand, or small rocks to create a realistic base. Paint the base to match the theme of your army or add additional details like grass, foliage, or debris for added realism. Citadel Texture paints like Astrogranite or Martian Ironcrust can create interesting textures for your base. - Step 8: Final Touches
Take a step back and assess your painted Master of Executions. Make any necessary touch-ups or adjustments to ensure a high-quality finish. Consider adding final details like battle damage, weathering effects, or blood splatters for an extra level of realism and intensity. Typhus Corrosion or Blood for the Blood God can be used to create weathering or blood effects.

