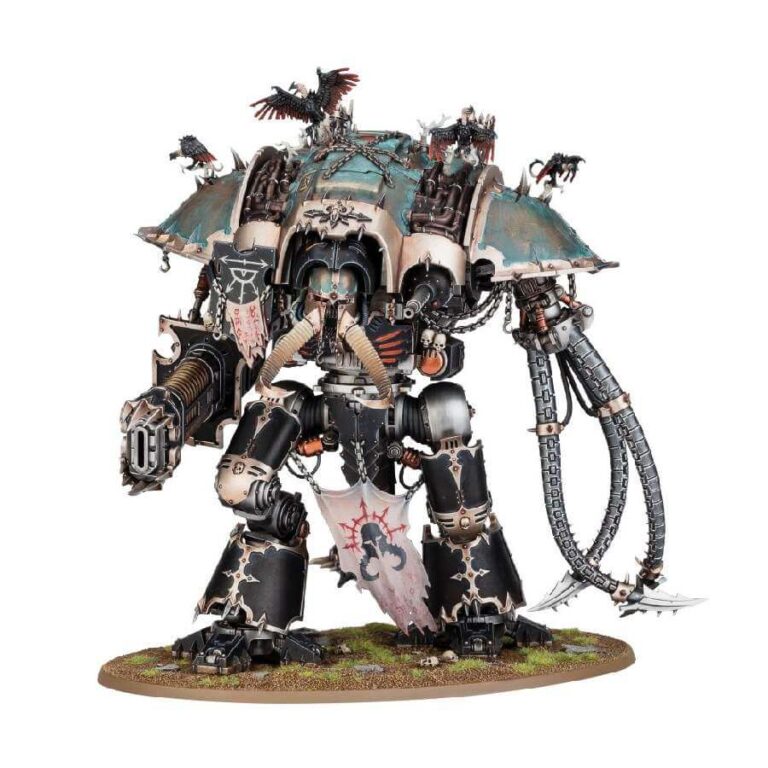
The Knights Abominant, regarded as blessed by the Dark Gods, embody the raw power of the warp, unleashing its malevolent energy to corrupt and mutate their surroundings while obliterating distant adversaries with volkite blasts. In close combat, they wield their coiling, warp-infused appendages to crush anything untouched by their taint.
This multipart plastic kit enables you to construct a Knight Abominant, an imposing Lords of War option for your Chaos Knights army or a versatile Dreadblade for other Chaos factions. Towering above the battlefield, this super-heavy walker is armed with a volkite combustor and writhing electroscourge, accompanied by a menacing swinging balemace tail and a carapace-mounted diabolus heavy stubber. Its formidable presence is enhanced by monstrous tusks jutting forward and avian pterrorshades perched atop its hull, making it an exceptional project for painters. The kit offers extensive customization opportunities, featuring intricate components such as fearsome faceplates, optional chains, pipes, spikes, and horns, allowing you to forge an unparalleled engine of malevolence.
What’s in the Knight Abominant box
- x176 plastic components kit with which you can make one Knight Abominant or a Knight Desecrator or Knight Rampager. Any remaining weapons, faceplates, or accessories can be used as spares for your other Knight kits.
- x1 Citadel 170mm Oval Base
- x1 Chaos Knights transfer sheet featuring 339 runes, sigils, and iconography various Dread Households.
How to paint the Knight Abominant set
- Step 1: Base Coat
Start by applying a solid base coat of black paint to the entire model using a brush or spray. Ensure that you achieve even coverage, as this will serve as the foundation for the subsequent layers of paint. Abaddon Black and Chaos Black are the best, most used options for this. - Step 2: Metallic Armor
Next, focus on the armor plates of the Knight Abominant. Use a dark metallic color like Leadbelcher or Iron Warriors to paint these areas. Apply thin layers of paint, allowing each layer to dry before adding another, to build up the metallic effect gradually. Leave the recesses and edges slightly darker to create depth and add visual interest to the model. - Step 3: Warp Energy
Now it’s time to bring out the eldritch power of the Knight Abominant’s warp abilities. Choose a bright color like Gauss Blaster Green or Warp Lightning to represent the warp energy. Carefully paint the areas where the warp energy emanates, such as the volkite combustor and electroscourge. Apply thin layers of paint to create a glowing effect, and consider blending the colors for a smooth transition between the different parts of the model. - Step 4: Corrupted Details
To enhance the theme of corruption and mutation, focus on painting the smaller details of the Knight Abominant. Use colors like Mephiston Red, Daemonette Hide, or Rakarth Flesh to pick out specific elements such as mutated flesh, horns, or additional appendages. Take your time and apply these colors with precision to make the details stand out and add a touch of gruesome beauty to the model. - Step 5: Finishing Touches
Lastly, add the finishing touches to complete your Knight Abominant. Use a dark wash like Nuln Oil or Agrax Earthshade to apply shading to the recesses and crevices of the model, enhancing the definition and adding depth. Then, highlight the raised edges and prominent areas with a lighter color to make them pop. You can also use a dry brushing technique to add a weathered or battle-worn effect to the model. Once you’re done, don’t forget to give your model a varnish to protect it against chipping and time.

