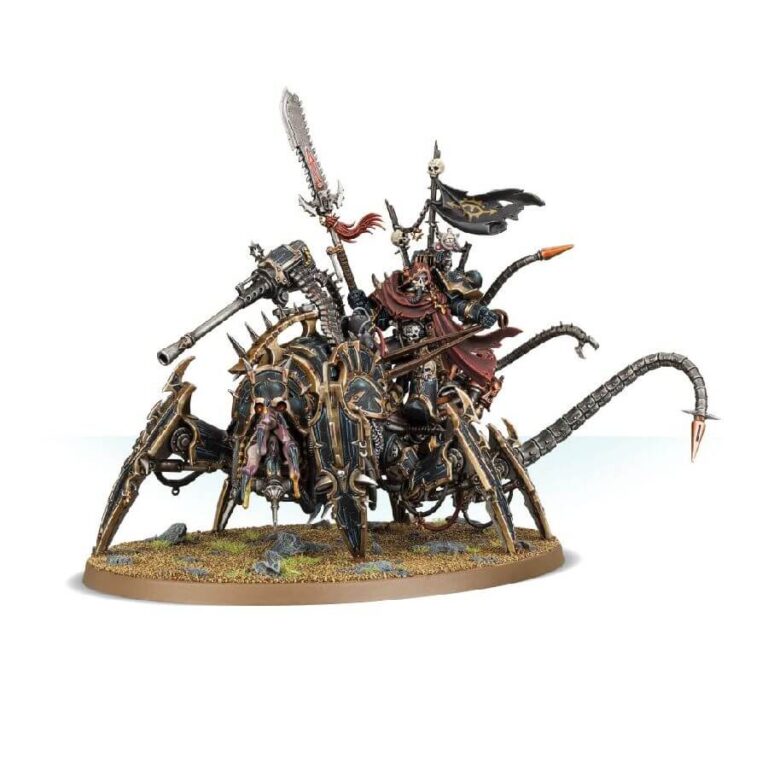
The Lord Discordant, a machine-obsessed heretic, rides atop a Helstalker mount, radiating an aura of anarchy that disrupts machinery and cripples enemy vehicles. In battle, the Lord Discordant harnesses the energy of dying vehicles, using it to empower other Daemon Engines or unleash destructive beams upon enemy systems. Among them, the renowned Vex Machinator brought chaos to the hivesprawls of Vigilus during the War of Nightmares.
Vex Machinator, Arch-Lord Discordant, is a multipart plastic kit that serves as a formidable HQ choice in Chaos Space Marines armies. The Helstalker mount can be armed with various devastating weapons, making it a formidable threat to enemy vehicles.
The Lord Discordant himself wields an enormous impaler glaive, and his mechatendrils are capable of striking out at foes. Additionally, the Daemon Engine steed can be equipped with a baleflamer or autocannon, along with a choice of either a magma cutter or a techno-virus injector.
What’s in the Vex Machinator, Arch-Lord Discordant box
- x63 plastic components that make Vex Machinator, Arch-Lord Discordant, a machine-obsessed heretic who scuttles across the battlefield atop a Helstalker mount
- x1 Citadel 120x92mm Oval Base
How to paint the Vex Machinator, Arch-Lord Discordant set
- Step 1: Basecoat
Start by applying a basecoat of black paint, such as Abaddon Black, to Vex Machinator’s armor. Ensure complete coverage, creating a solid foundation for subsequent layers. - Step 2: Metallic Parts
Use a metallic silver paint, like Runelord Brass, to paint the mechanical and metallic components of Vex Machinator, such as his weapons, armor trim, and mechanical parts. Take your time and apply the paint carefully, ensuring neat and even coverage. - Step 3: Contrast Colors
Apply a contrast paint, such as Basilicanum Grey, to the black areas of Vex Machinator’s armor. This will create shading and depth, enhancing the details and adding visual interest. - Step 4: Brass Accents
Using a brass paint, like Balthasar Gold, carefully paint the brass accents on Vex Machinator, such as decorative elements, trims, or any other designated areas. Aim for smooth and precise coverage. - Step 5: Details and Highlights
Apply a lighter silver paint, such as Ironbreaker, to the raised edges and prominent areas of the metallic parts. This will create highlights, adding depth and giving a metallic sheen to the model. - Step 6: Glow Effects
Using a bright green paint, like Moot Green, carefully paint any areas that emit a glow, such as the eyes or energy coils. Apply thin layers to build up the intensity of the glow gradually. - Step 7: Additional Details
Add any desired additional details, such as symbols, icons, or decorative elements, using appropriate colors. For example, Mephiston Red or Evil Sunz Scarlet can be used for red accents, and White Scar for any white details. - Step 8: Basing
Finish the model by painting the base to complement Vex Machinator’s appearance. You can use various techniques, such as dry brushing brown or applying texture paints, to create a realistic and captivating base. - Step 9: Varnish
To protect your beautifully painted model and give it a finished look, apply a layer of varnish. Use a matte varnish to eliminate any unwanted shine or a gloss varnish for a shiny finish. Apply the varnish evenly and allow it to dry completely according to the manufacturer’s instructions. This will help protect your paint job from wear and tear, ensuring your masterpiece stays vibrant and intact.

