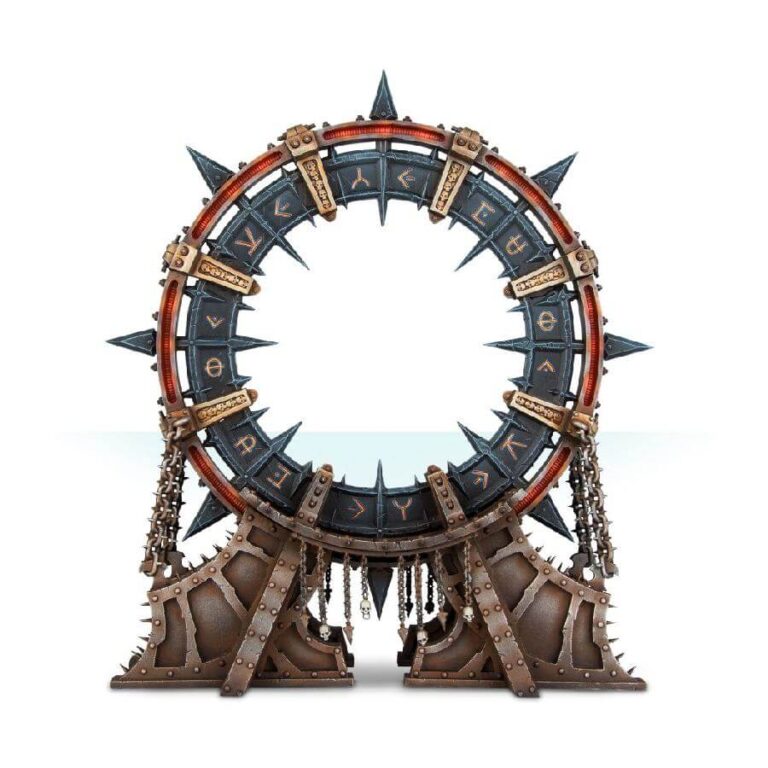
The Noctilith Crown stands as a dedicated Fortification, a cornerstone of strength within your Chaos army. Its protective energy shield becomes an impenetrable barrier, rendering long-ranged warriors such as Havocs and Obliterators incredibly resistant to displacement.
As chaos-infused Psykers, including your Sorcerers and allied Daemons, take control of the Psychic phase, they gain the ability to re-roll failed Psychic tests. This mastery over the mystical arts strikes fear into the hearts of your adversaries, as they face an amplified risk of succumbing to the dreaded Perils of the Warp!
With this kit, you can construct your very own Noctilith Crown, a structure that seamlessly aligns with the techno-baroque aesthetic embraced by the Chaos Space Marines. Its towering presence serves as a centerpiece, binding your collection together in an undeniable display of malevolence.
Utilize it as a formidable Fortification during your games, or seize the opportunity to acquire multiple kits and forge a nightmarish battlefield imbued with the unmistakable essence of Chaos.
What’s in the Noctilith Crown box
- x24 plastic components that make this fortification unit for your Chaos armies
How to paint the Noctilith Crown set
- Step 1: Prime the model
Apply a primer to the Noctilith Crown using Chaos Black or White Scar primer. This provides a smooth base for painting and helps the subsequent layers adhere better. - Step 2: Basecoat the model
Using a medium-sized brush, apply a base color to the model. For example, use black for the stone sections and a metallic color like Leadbelcher for the metal parts. Apply the paint evenly, covering the entire model. - Step 3: Apply washes for shading
Using a wash like Nuln Oil or a mix of Drakenhof Nightshade and Targor Rageshade, apply it to the recesses and crevices of the model. This will add depth and shadows to the details. Let the wash dry completely. - Step 4: Highlight the model
Using a lighter shade of the base colors, apply highlights to the raised areas of the model. For example, use a lighter gray for drybrushing the stone sections and a brighter metallic color like Ironbreaker for drybrushing the metal parts. Drybrushing involves lightly brushing the raised areas with a small amount of paint on the brush, catching only the top edges and details. - Step 5: Add additional details
Using a fine detail brush, paint any additional details on the model, such as symbols, runes, or glowing effects. You can use colors like Mephiston Red or Troll Slayer Orange for the glowing parts, and colors like Abaddon Black or Mechanicus Standard Grey for the symbols and runes. - Step 6: Paint the base
Paint the base of the Noctilith Crown using colors that match your desired theme or army. You can use textures, flock, or tufts to add depth and interest to the base. Colors like Stirland Mud or Astrogranite work well for creating a rocky or desolate base. - Step 7: Varnish and protect
Apply a layer of varnish or a protective spray over the model to protect the paint and make it more durable. This will help prevent chipping and wear over time.

