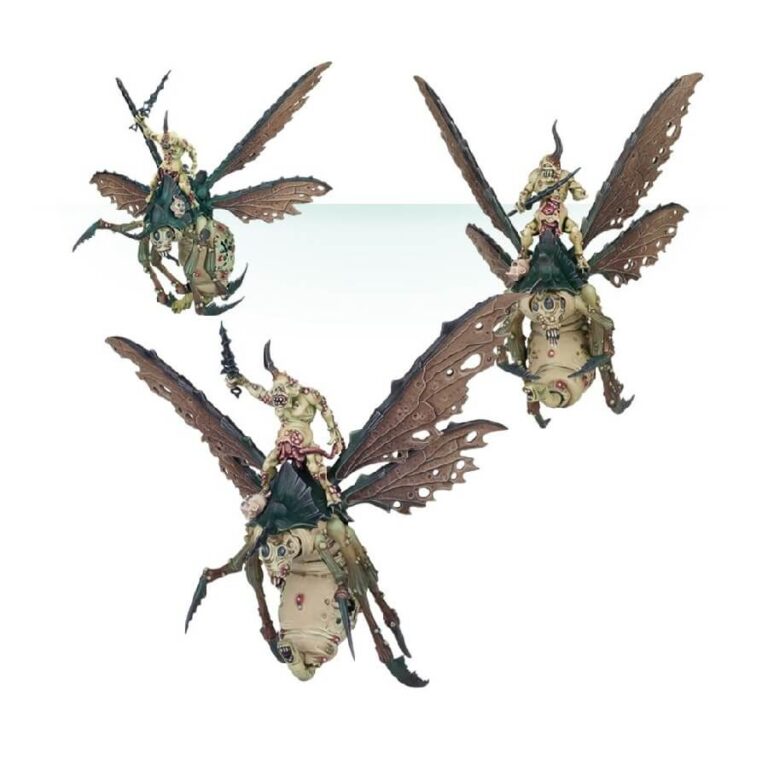
Amidst a menagerie of stomach-churning abominations, it is the Plague Drones of Nurgle that truly stand out, embodying a level of hideousness that defies comprehension. Each model showcases a Plaguebearer perched atop an enormous Rot Fly, an awe-inspiring creature adorned with two pairs of ragged wings and a body riddled with repulsive lumps and boils. In a macabre display of grotesquery, exposed innards glisten amidst the creature’s form, while within one of its bulbous abdomens, the contorted faces of unfortunate victims peer out – trapped in a state of partial digestion.
What makes these dread-inducing beings even more remarkable is the uniqueness of each Rot Fly. Each one possesses distinct features, ranging from a menacing Plague Proboscis, sharp mandibles ready to rend flesh, to a venomous stinger poised to strike. As for the Plaguebearers themselves, they too bear the mark of their loathsome patron, Nurgle. Boils and open sores adorn their bodies, while exposed entrails writhe in a grotesque display of corruption. Their twisted countenances boast an array of horns, and they punctuate their presence with unsettling gestures from their bony, decaying fingers. Some clutch skulls as trophies of their gruesome conquests, while others wield crude blades, ever-ready to unleash devastation upon their foes.
If you like the disgusting nature of these creatures, you may be interested in this too:
What’s in the Plague Drones of Nurgle box
- x86 components with which to make 3 Plague Drones of Nurgle
- x3 Citadel 60mm round bases
How to paint the Plague Drones of Nurgle set
- Step 1: Prime your models
Start by priming your Plague Drones with a light-colored primer. This will provide a smooth surface for the paint to adhere to and enhance the vibrancy of the colors. A white or light grey primer works well for this step. - Step 2: Basecoat the models
Begin by applying a basecoat of a dark green color to the Rot Flies bodies. For example, you can use a paint like Death Guard Green to establish the foundational color. Use thin layers and ensure smooth coverage. - Step 3: Highlight the details
Next, highlight the prominent details on the Rot Flies using a lighter shade of green. Apply this color to areas such as the wings, lumps, and boils. For instance, you can use Nurgling Green to bring out these areas and create depth. If you want to go for a contrasting look (like the one in the display picture) you can use Abaddon Black for this. - Step 4: Add texture and decay
To create a truly repugnant effect, apply a wash of dark brown or sepia color over the entire model. This will settle into the recesses and crevices, accentuating the decayed look. Consider using a wash like Agrax Earthshade or Seraphim Sepia for this step. - Step 5: Paint the Plaguebearers
Now it’s time to paint the Plaguebearers themselves. Start by applying a basecoat of a sickly yellow or green color to their skin. Use Nurgles Rot and Screamer Pink to paint their exposed flesh and Nurgle boils. - Step 6: Highlight the details on the Plaguebearers
Once the basecoat is dry, highlight the raised areas of the Plaguebearers skin with a lighter shade. This will add depth and bring out the details. For example, use Kroak Green to enhance the texture and emphasize the boils and sores. - Step 7: Add extra details
To make the Plaguebearers even more grotesque, paint their horns, fingers, and any exposed bone with a bone-colored paint, such as Skeleton Horde. This will create a stark contrast against their diseased flesh. - Step 8: Finishing touches
To complete the look, carefully paint the blades or skulls that the Plaguebearers hold. Consider using metallic paints like Skullcrusher Brass for blades or Praxeti White for skulls to add a touch of realism and variety to the models.

