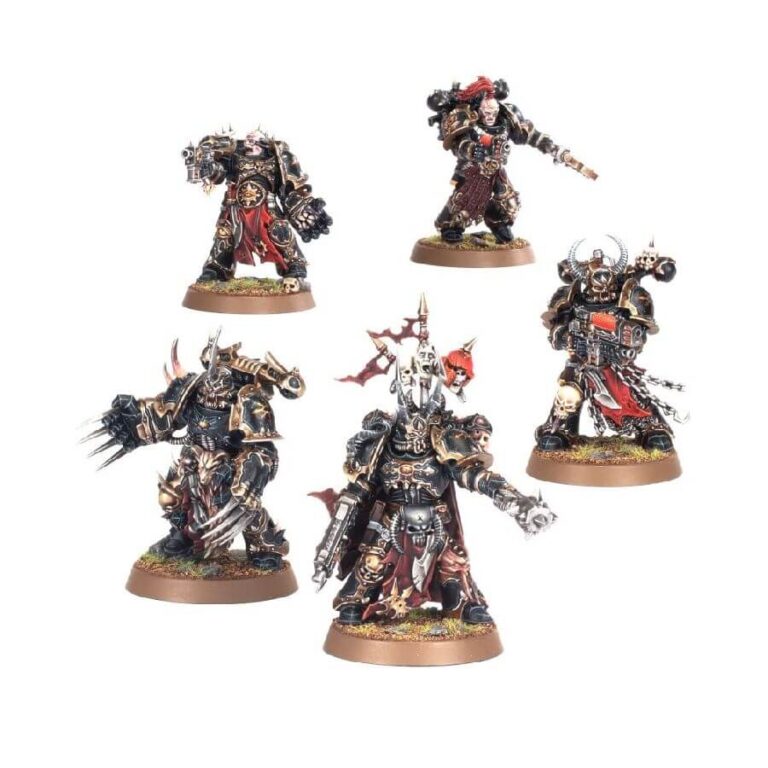
This exceptional multipart plastic kit enables you to assemble a formidable unit of five Chosen, serving as the vanguard in assaults against enemy positions. With an array of brutal melee armaments at their disposal, including chainswords, chainaxes, power fists, lightning claws, and various power weapons, these veterans are prepared to engage in close-quarters combat. Additionally, they carry bolt pistols and boltguns, while optional special weapons such as plasma pistols and combi-weapons (offering configurations of flamer, melta, or plasma) allow them to unleash devastating firepower upon their foes.
The versatility of this kit extends beyond weaponry, as it presents an expansive range of customization options. You have the freedom to choose from five unique backpacks, ten distinct shoulder pads, and an impressive selection of thirteen heads, both helmeted and bare, each exuding its own individual character. Moreover, a plethora of accessories further enhances the customization possibilities. Delve into the depths of personalization by constructing a Chosen Champion, adorning them with a choice of chestplates, loincloths, trophies, and a Chaos icon symbolizing one of the Chaos Gods.
Embrace the power, adaptability, and sheer malevolence of the Chosen, and let their presence on the battlefield strike fear into the hearts of all who dare to oppose them. Unleash your creativity as you assemble and customize these iconic Chaos Space Marine Elites, forging a force to be reckoned with in the grim darkness of the 41st millennium.
What’s in the Chosen box
- x102 plastic components that make 5 Chosen miniatures, an Elite choice for your Chaos Space Marine armies.
- x5 Citadel 32mm Round Bases
How to paint the Chosen set
- Step 1: Assemble the Model
Carefully assemble the Chosen miniatures using plastic glue as per the provided instructions. Ensure all the parts fit securely together. - Step 2: Prime the Model
Apply a thin, even coat of primer to the model. This helps the paint adhere better and provides a smooth surface to work on. Chaos Black fits the theme and is overall a good option for priming your miniatures - Step 3: Basecoat the Armor
Start by applying a basecoat of your chosen color to the armor. For example, you can use a dark metallic color like Leadbelcher or a deep red like Khorne Red. For the classic look, use a rich black, like Abaddon Black. Apply the basecoat using a brush, covering all the armor sections. - Step 4: Layer the Armor
Once the basecoat is dry, add depth and dimension to the armor by layering. Use a lighter shade of your chosen color, such as Ironbreaker for metallic armor or Evil Sunz Scarlet for red armor, and carefully apply thin layers to the raised areas. This creates highlights and brings out the details. - Step 5: Paint the Details
Focus on painting the details of the model, such as the weapons, accessories, and any additional elements you want to highlight. Use different colors to make them stand out. For example, paint the weapons with contrasting colors like Runelord Brass or Wazdakka Red. Use a smaller brush for precision. - Step 6: Wash the Model
Apply a wash to the entire model to add depth and shading. Use a wash specifically designed for your chosen color, such as Nuln Oil for metallics or Carroburg Crimson for reds. Gently brush it over the areas where shadows naturally occur, such as recesses and crevices. The wash settles into these areas, creating realistic shadows. - Step 7: Highlight the Model
To further enhance the details, highlight the edges and prominent features of the model. Use a lighter shade of your chosen color, such as Stormhost Silver for metallics or Wild Rider Red for reds, and gently brush it along the edges to create a subtle pop and add definition. - Step 8: Paint the Additional Elements
Pay attention to any additional elements like symbols, icons, or accessories. Use different colors to make them stand out. For example, use a bright color like Mephiston Red or Gehenna’s Gold for icons or decorations. Be precise and take your time. - Step 9: Paint the Base
Don’t forget to paint the base of the model. Use colors that complement the overall scheme. For example, you can use a dark brown like Dryad Bark, then drybrush it with a lighter brown like Baneblade Brown to add texture and depth. Add some grass or rocks for added realism if desired. - Step 10: Varnish the Model
Once the paint is dry, protect your work by applying a coat of varnish. This helps prevent chipping and damage during gameplay. Use a matte varnish for a natural finish or a gloss varnish for a shiny appearance. Follow the instructions on the varnish bottle for best results.

