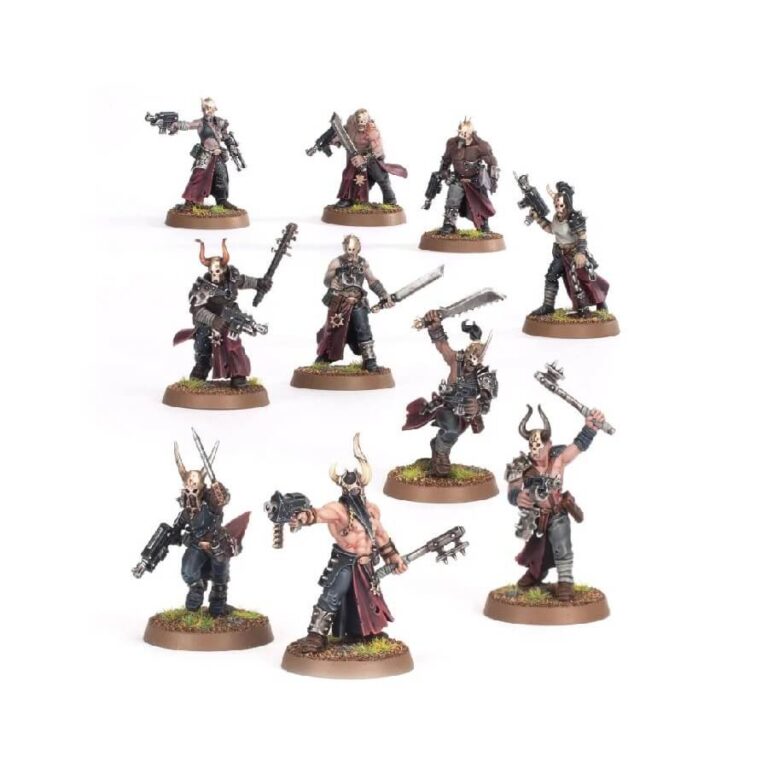
Chaos Cultists, mortal followers of the Dark Gods, eagerly embrace the promises of temporal power, becoming the devoted servants of heretic warlords. United in massive Cultist Mobs, these zealous individuals charge fearlessly into battle, armed with a chaotic assortment of stolen, improvised, and makeshift weapons. Overwhelming their foes with sheer numbers, this blasphemous militia proves that even ordinary men and women can become formidable forces in the service of Chaos.
This multipart plastic kit enables you to assemble 10 Chaos Cultists, each equipped with a unique combination of weapons such as autopistols, brutal assault weapons, frag grenades, and krak grenades. These models boast intricate details, showcasing Chaos symbols, pendants, daemonic masks, and robes. Their weapons range from crude bionics to vicious machetes, reflecting the haphazard nature of their armaments. Additionally, the kit includes two special Cultist Champions: a mutated female Cultist Champion with a horned head and a tentacled arm wielding a chainsword, and a male Cultist Champion wearing a ragged mask and armed with a bolt pistol.
Also available in this box set:
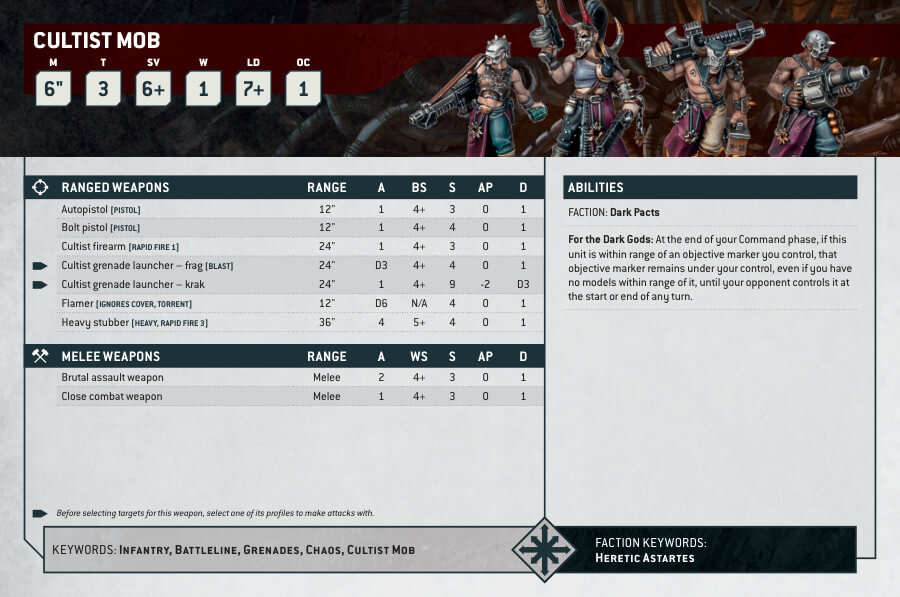
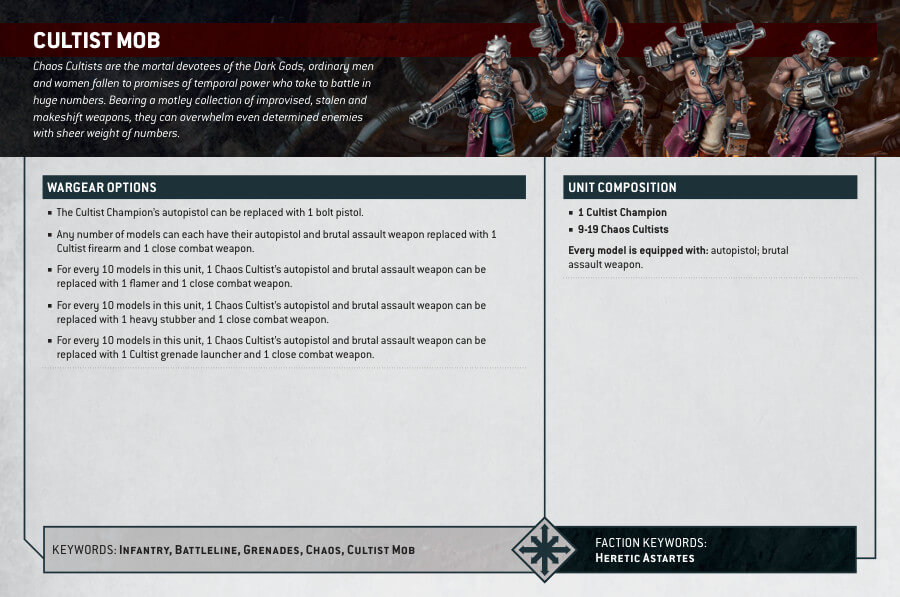
Chaos Cultists Datasheets
What’s in the Chaos Cultists box
- x41 plastic components that make 10 Chaos Cultists
- x10 Citadel 25mm Round Bases
How to paint the Chaos Cultists set
- Step 1: Prime the miniatures
Apply a thin, even coat of primer to the Chaos Cultists. This helps the paint adhere better and provides a smooth surface for painting. You can use Chaos Black or White Scar primer sprays based on your desired color scheme. - Step 2: Basecoat the miniatures
Using a medium-sized brush, apply the base colors to each part of the miniatures. For example, you can use a dark brown like Rhinox Hide for their clothing, a rusty brown like Mournfang Brown for their weapons, and a pale flesh color like Kislev Flesh for their skin. Apply the paint evenly, covering the entire area, and let it dry before moving on to the next step. - Step 3: Apply washes for shading
Using a wash such as Agrax Earthshade for the clothing and weapons, and Reikland Fleshshade for the skin, apply it to the recesses and crevices of the miniatures. This adds depth and shadows to their features. Let the wash dry completely. - Step 4: Highlight the miniatures
Using a lighter shade of the base colors, apply highlights to the raised areas of the miniatures to create contrast and make the details stand out. For example, you can use Baneblade Brown for highlighting the clothing, and Ushabti Bone for highlighting the weapons and skin. Apply the highlights sparingly, focusing on the most prominent areas. - Step 5: Add details and accents
Now it’s time to add additional details and accents to enhance the overall look of the miniatures. Use smaller brushes to paint details like the eyes, teeth, and accessories. You can use colors like Abaddon Black for the eyes and Leadbelcher for any metallic parts. Take your time and be patient while painting these intricate parts. - Step 6: Paint the bases
To complete the miniatures, paint the bases. You can use a dark brown or gray for a basic base color. Then, drybrush with a lighter shade like Karak Stone to add texture and highlight the edges of the bases. You can also add small details like rocks, grass, or bits of debris to make the bases more interesting. - Step 7: Varnish and protect
Once you’re satisfied with the paintjob, apply a layer of varnish or a protective spray over the miniatures. This helps protect the paint and makes it more durable, ensuring your hard work lasts.

