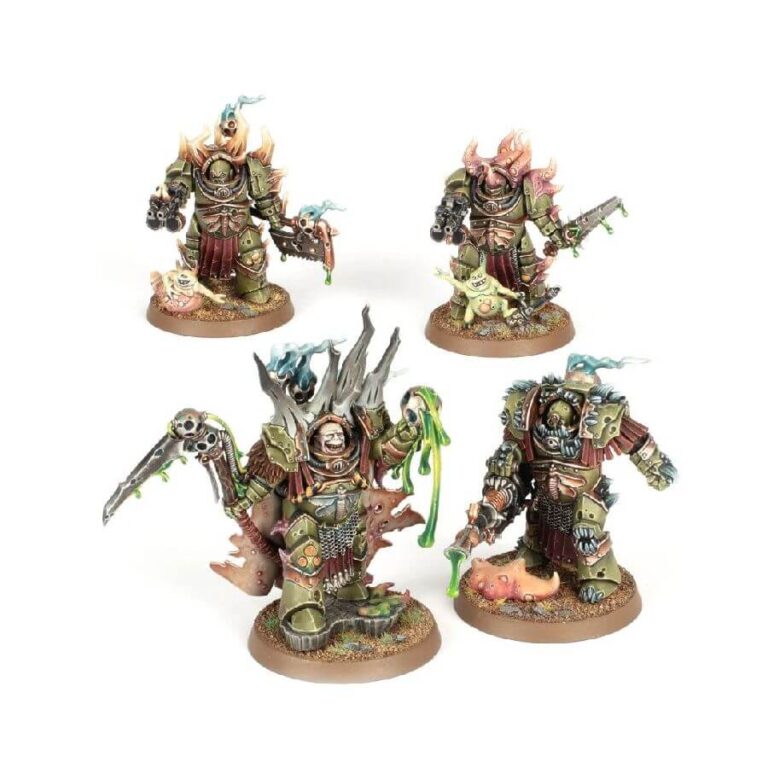
Lord Felthius, armed with a manreaper, effortlessly overwhelms lesser foes. Despite his rotting armor, he maintains a cheerful expression as he proudly holds a plague censer aloft, dripping vile, disease-ridden fluids. Adorned in chainmail, furs, and a boil-covered cloak, Lord Felthius exudes decay. His manreaper features intricate connectors and pipes that spread infectious fluids upon contact.
The accompanying Tainted Cohort, composed of three Blightlord Terminators, fearlessly braves intense battlefield conditions. Each member carries a unique weapon: one wields a combi-bolter and balesword, another a combi-bolter and bubotic axe, and the third a dribbling plaguespewer. Their rusted armor bears Nurgle’s repulsive marks, and the balesword-wielding Blightlord Terminator showcases grotesque bubo-covered tentacles in place of a face—a testament to Nurgle’s corruption.
Completing the miniatures are three additional details on the bases. One Nurgling pulls the pin from a grenade, embodying the Death Guard’s chaotic nature. Another wears a sinister grin, reveling in the horrors of battle. Lastly, a mass of trembling tentacles serves as a reminder of the mutations caused by Nurgle’s blessings.
What’s in the Lord Felthius and the Tainted Cohort box
- x26 plastic components, with which you can assemble one Lord Felthius, Lord of Contagion, and three Blightlord Terminators
- x4 Citadel 40mm Round Bases
How to paint the Lord Felthius and the Tainted Cohort set
- Step 1: Prime your miniatures
Using a spray primer, apply an even coat to your models. This will provide a smooth surface for the paint to adhere to. A grey or black primer works well for Death Guard. - Step 2: Base coat the armor
Begin by applying a base coat to the armor using a color like Death Guard Green. Thin your paint with water or a medium, and use a medium-sized brush to cover the armor evenly. Make sure to get into all the crevices and details. - Step 3: Add details with a wash
Next, use a wash such as Agrax Earthshade to bring out the details on the armor. Apply the wash to the recesses, allowing it to flow into the cracks and crevices. This will create shadows and depth. - Step 4: Highlight the armor
Using a lighter shade, like Nurgling Green, apply a drybrushing technique to highlight the edges and raised areas of the armor. Dip your brush lightly in the paint, then wipe off the excess on a tissue. Gently brush over the armor, catching the raised surfaces. This will add dimension to the miniatures. - Step 5: Paint the weapons
Choose appropriate colors for the weapons, such as a rusty metallic for the blades or a sickly yellow for the plaguespewer. Apply the base color to the weapons, and then use a wash or drybrush technique to add depth and highlights. - Step 6: Detail the faces
Using a small brush, carefully paint the faces of Lord Felthius and the Blightlord Terminators. Start with a base color like Bugman’s Glow for the flesh, and then add highlights with a lighter tone such as Cadian Fleshtone. Don’t forget to paint the eyes using a small dot of Mephiston Red for a sinister look. - Step 7: Finish the bases
Paint the bases in a suitable color, such as a muddy brown or a decaying green. Add texture with small rocks, grass tufts, or any other basing materials you prefer. This will give your miniatures a finished look. - Step 8: Protect your work
Once the paint is dry, apply a protective varnish to seal and protect your miniatures. This will prevent the paint from chipping or rubbing off during gameplay.

