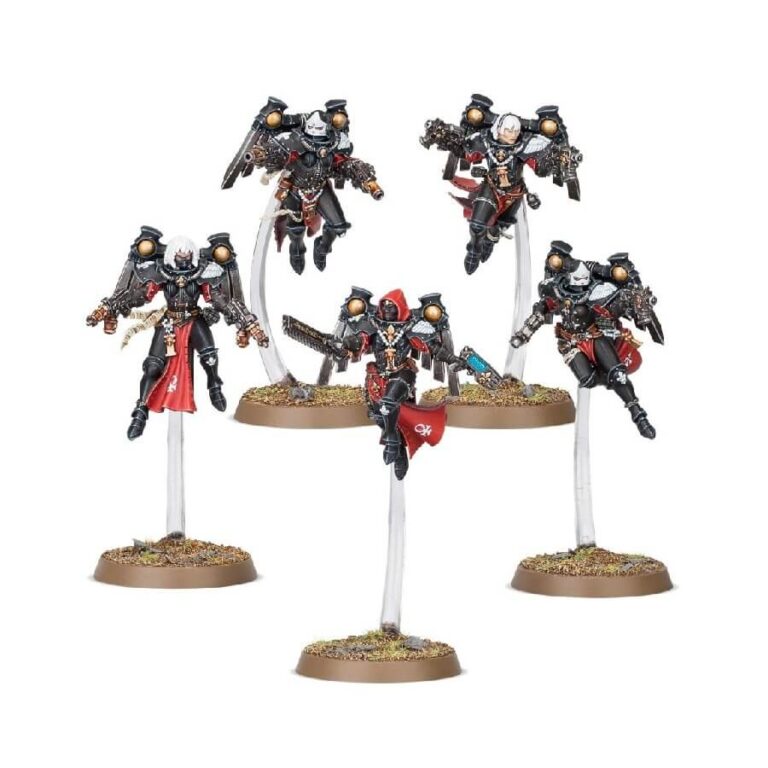
Step into the vanguard of the Adepta Sororitas with the Seraphim, angelic warriors who descend upon the enemy from above. Armed with San Leor pattern jump packs, they bring shock and awe to the battlefield, disrupting enemy formations before the Sisters of Battle open fire. Each Seraphim carries a powerful pair of pistols, chosen from a trinity of devastating options. Bolt pistols rain death from the skies, hand flamers engulf packed ranks in flames, and inferno pistols unleash focused beams of heat that effortlessly melt through armor and flesh.
This kit allows you to assemble a squad of five Seraphims. Each Seraphim is equipped with two bolt pistols, but two of them can be armed with hand flamers, while another two can wield inferno pistols. Additionally, one model can be built as a Seraphim Superior, who can choose between a bolt pistol, plasma pistol, and a selection of melee weapons such as a chainsword or power sword.
What’s in the Seraphim Squad box
- x107 plastic components, providing a wide range of options for customization and assembly.
- x5 Citadel 32mm Round Bases, sturdy bases that provide stability and allow for easy display and gameplay.
- x2 Citadel 45mm Groove Stem Sets, which offer additional height options for dynamic posing and versatility.
- x1 Adepta Sororitas Transfer Sheet is provided, featuring a variety of intricate and detailed transfers for adding symbols, emblems, and markings to the miniatures, enhancing their visual appeal and tying them to the Adepta Sororitas faction.
How to paint the Seraphim Squad set
- Step 1: Basecoat the models
Apply a smooth and even basecoat of black paint to the armor using Abaddon Black. Ensure full coverage, as this will serve as the foundation for the rest of the colors. - Step 2: Paint the red clothing elements
Using a vibrant red hue like Mephiston Red, carefully paint the clothing elements of the Seraphim Squad. Apply thin layers to achieve a rich and consistent color. - Step 3: Highlight the red clothing
To add depth and definition to the red clothing, use a lighter shade such as Evil Sunz Scarlet to carefully apply highlights on the raised areas and edges. This will create a subtle gradient effect. - Step 4: Paint the white details
Choose a crisp white color like White Scar to paint the intricate details of the miniatures, such as purity seals, squad markings, and symbols. Apply multiple thin coats for a clean and bright appearance. - Step 5: Highlight the white details
Using a slightly off-white shade such as Ushabti Bone, carefully apply highlights to the edges and raised areas of the white details. This will add dimension and make the details stand out. - Step 6: Paint the gold details
For the ornate gold elements of the Seraphim Squad, select a rich gold color like Retributor Armor. Apply the gold paint with precision, ensuring a smooth and even finish. - Step 7: Shade and wash
To enhance the depth and shadows, apply washes to the recessed areas and crevices of the miniatures. For the black armor, use Nuln Oil to create a dark, shadowy effect. For the red clothing, apply a thin wash of Carroburg Crimson to add depth and richness. - Step 8: Highlight the gold details
Using a lighter gold shade like Liberator Gold, carefully apply highlights to the edges and raised areas of the gold elements. This will create a lustrous and eye-catching effect. - Step 9: Base the models
Paint the bases with a suitable color, such as a textured gray or brown tone. For example, use Mechanicus Standard Grey as the base color and add depth with Astrogranite texture paint. Enhance the base further by adding details like grass tufts, rocks, or debris for a more realistic appearance. - Step 10: Varnish the miniatures
Apply a protective varnish to the painted miniatures to safeguard the paintwork and give them a professional finish. Consider using a matte varnish to reduce shine and create a more realistic appearance.

