The Sisters of the Orders Hospitaller, revered healers within the Adepta Sororitas, possess a unique blend of physical and spiritual abilities. Their mastery of medicine and surgical expertise is only matched by the wellspring of faith they provide to those in desperate need. Through soothing prayers and steadfast recitations of fortitude, they offer solace to the afflicted, drawing inspiration from the remarkable saints who endured immense suffering with unwavering grace. With whispered mantras of vitality, they alleviate the agony of wounds and dispel weariness like a lifting fog.
In the midst of the chaotic battleground, the Hospitallers fearlessly plunge into the visceral chaos, their hands deep in the crimson tide of flesh. Amidst the cries of pain, these devout healers denounce religious animosity, sifting through the writhing warriors to extract burning rad slugs, shards of crystallized grief, and jagged remnants of polluted shrapnel.
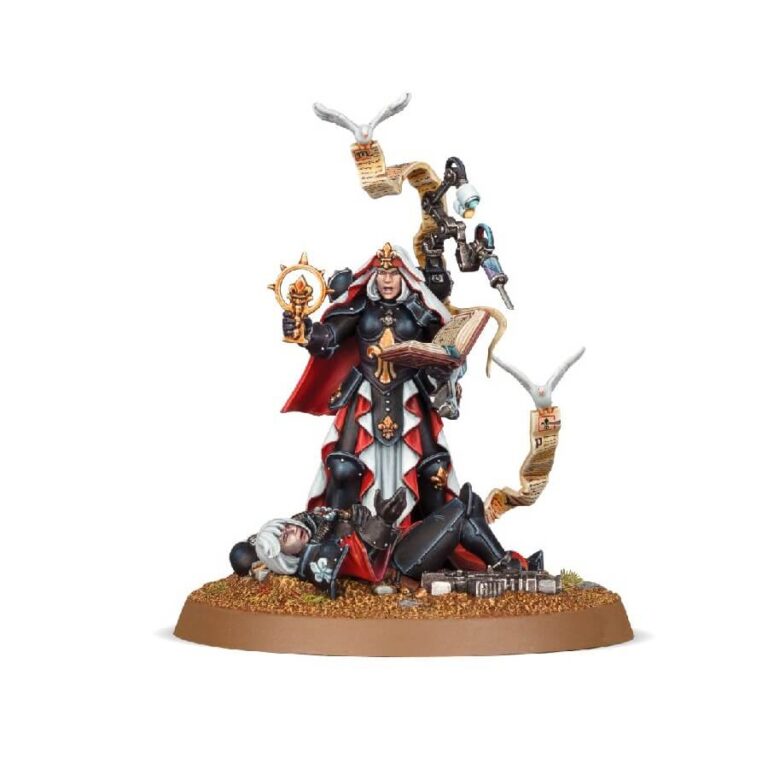
An Elites choice for the Adepta Sororitas, the Hospitaller stands as a symbol of unwavering dedication. Equipped with a holstered bolt pistol and the precise tools of a chirurgeon, she exemplifies her role. At her feet lies a fallen Battle Sister, with her life slipping away. With reverence and determination, the Hospitaller recites the last rites from a sacred tome, honoring her fallen comrade’s sacrifice.
Hospitaller Datasheets
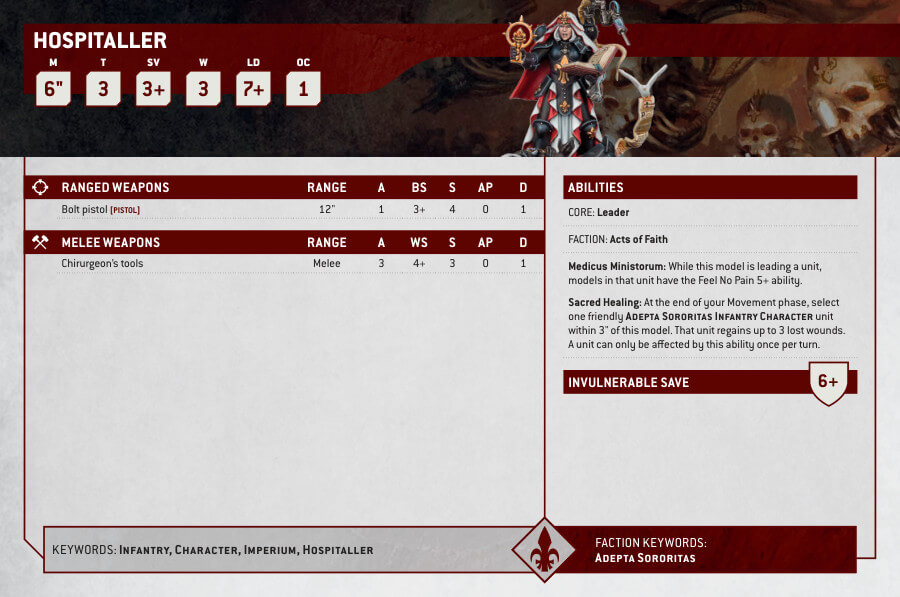

What’s in the Hospitaller box
- x26 components
- x1 Citadel 50mm Round Base
How to paint the Hospitaller set
- Step 1: Prepare Your Workspace
Before starting, ensure you have a clean and well-lit workspace. Gather all the necessary materials, including your Hospitaller model, paints, brushes, water, palette, and paper towels. - Step 2: Prime Your Model
Apply a thin and even coat of primer to your Hospitaller model. Primer helps the paint adhere better and gives a smooth surface for painting. For this step, you can use Chaos Black Spray. - Step 3: Basecoat the Armor
Choose a base color for the armor. For example, Retributor Armor is a good choice for a gold armor effect, but if you want to go with the classic look use Abaddon Black. Using a medium-sized brush, apply the base color to the entire armor area, making sure to cover all the surfaces evenly. - Step 4: Shade the Armor
Shading adds depth and definition to your model. Use Reikland Fleshshade to shade the recessed areas of the armor. Apply the shade with a small brush, focusing on the crevices and corners. The shade will settle into these areas, creating shadows and adding dimension. - Step 5: Highlight the Armor
Highlighting brings out the details and adds contrast to your model. Select a lighter gold color like Liberator Gold for highlighting. Use a small brush and apply the paint to raised edges and prominent areas of the armor, such as edges of plates or raised decorations. - Step 6: Paint the Robes
For the robes, choose a color that complements the armor. Khorne Red is a suitable option. Use a medium brush and apply the base color to the robe areas, ensuring even coverage. - Step 7: Shade the Robes
Apply shade to the robes using Carroburg Crimson. Use a small brush to apply the shade to the recessed areas of the robes, such as folds and creases. This will create depth and enhance the texture. - Step 8: Highlight the Robes
Choose a lighter red color, like Evil Sunz Scarlet, for highlighting the robes. Use a small brush and apply the paint to raised areas of the robes, such as the top edges of folds and creases. This will add dimension and make the details pop. - Step 9: Paint the Details
Now it’s time to focus on smaller details like the face, accessories, and weapons. Use appropriate colors for each detail. Leadbelcher can be used for metallic areas, such as weapons or buckles. Rakarth Flesh is great for painting skin tones. - Step 10: Seal the Model (Optional)
To protect your paintwork and add a matte or glossy finish, you can apply a varnish or sealer to your model. Munitorum Varnish provides a protective coat without altering the colors.

