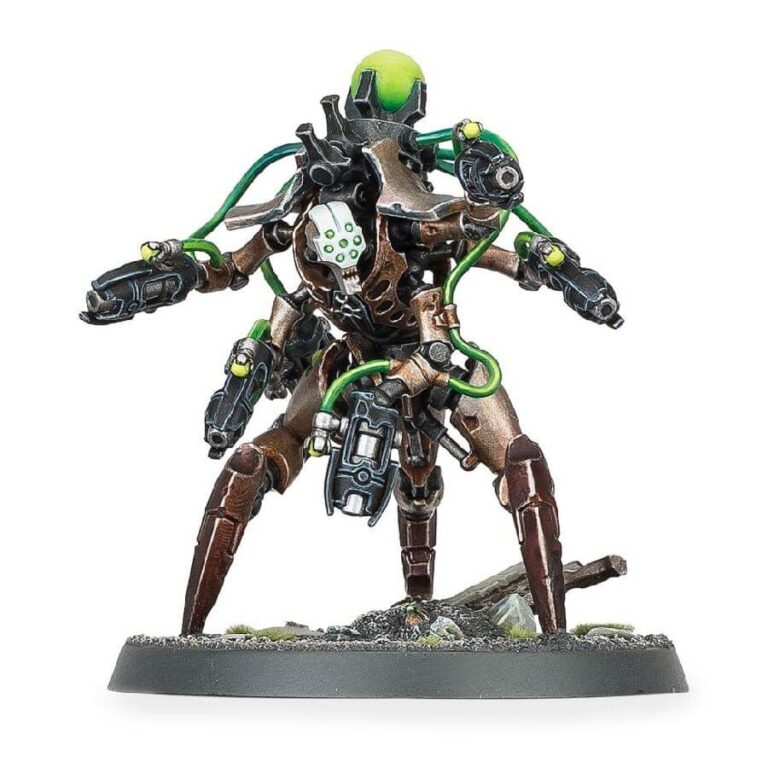
Discover the intriguing evolution of the Hexmark Destroyers, once known as the Deathmarks of yore. Emerging with a predatory prowess from their dimensional chambers, these remarkable beings don a distinctive hunched posture as they unleash a torrent of enmitic fire, ensnaring their targets within an inescapable barrage. Aided by precision ocular targeting and perfected firing sequences, the Hexmark Destroyers leave their prey with no route to evade their devastating assault.
In the realm of close-range firepower, the Hexmark Destroyers rise as unchallenged Necron champions, embodying the essence of a mobile artillery unit. Each destroyer stands as a formidable gun battery, systematically dismantling swarms of enemy infantry with an air of assuredness. Whether you seek to fortify your advancing forces or bolster a vulnerable flank with unwavering fire support, the Hexmark Destroyer stands ready to meet your tactical needs.
What’s in the Hexmark Destroyer box
- x19 plastic components that make one Hexmark Destroyer.
- x1 Citadel 50mm Round Base.
How to paint the Hexmark Destroyer set
- Step 1: Base Coating the Model
Begin by applying a smooth base coat of Runelord Brass to the Hexmark Destroyer’s armor. This rich metallic shade forms the basis for the model’s distinctive appearance. - Step 2: Glowing Energy Sources
Using a detail brush, paint the eyes and any energy sources with a bright color like Warpstone Glow or Moot Green. This vibrant touch creates an alluring contrast against the metallic armor. - Step 3: Metallic Accents
Next, use a small brush to carefully paint the metallic parts on the model, such as the enmitic disintegrator pistols, with a metallic paint like Ironbreaker or Leadbelcher. This adds a captivating dynamic to the model’s overall look. - Step 4: Detailing the Weapons
Enhance the enmitic disintegrator pistols with detailing. Choose a complementary color, like Abaddon Black, to emphasize buttons and ornamentation, bringing depth to the weapons. - Step 5: Shading for Depth
Apply a thin layer of Nuln Oil to the model’s armor and intricate parts to create shading and depth. This technique brings out the finer details and adds realism. - Step 6: Layering and Highlights
Using a slightly lighter shade than Runelord Brass, layer over raised areas to create highlights. A color like Brass Scorpion is a great choice for this step. - Step 7: Fine Highlights
With an even lighter color like Sycorax Bronze, apply delicate highlights to the sharpest edges and focal points of the model. This meticulous touch adds realism and makes the model visually appealing. - Step 8: Final Touches
To achieve a luminous energy effect, apply a wash of a suitable color like Biel-Tan Green over the glowing energy sources. This accentuates their brilliance and brings a dynamic quality to the model.
You can also paint his face mask with White Scar, as a final detail. - Step 9: Basing
Finish the model by painting the base. Opt for colors that harmonize with your Hexmark Destroyer’s theme, be it desert tones or urban shades. For example, you can use Stirland Battlemire or Martian Ironearth. - Step 10: Varnishing
Once the paint is dry, seal your model with a varnish. This protective layer ensures your meticulous work remains intact and resilient during gameplay and display. For this model, we would use Ardcoat, as it has a glossy finish and would complement the shiny look of the armour.

