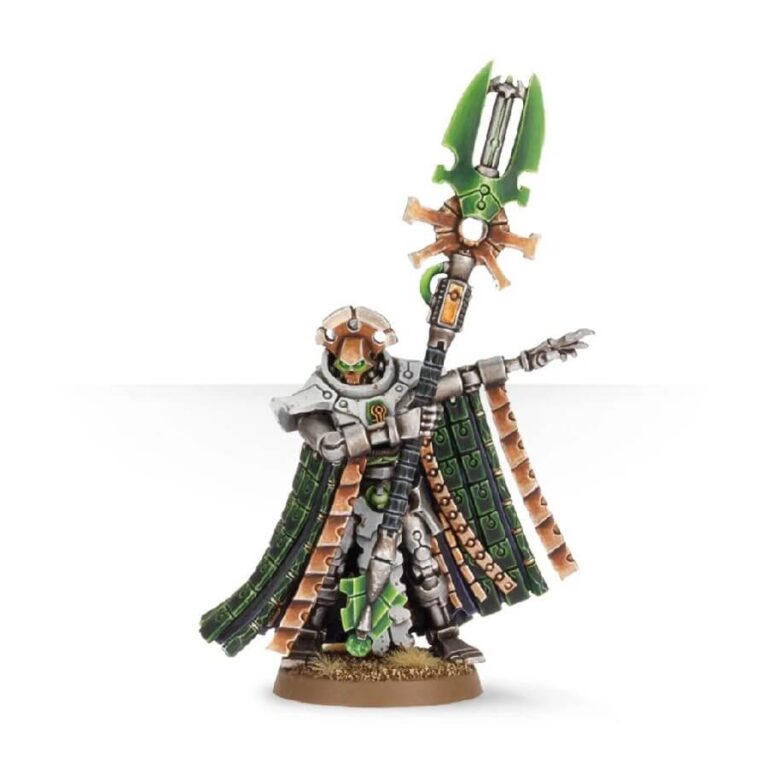
Nemesor Zahndrekh, renowned for his past conquests, emerged as a formidable general within the dynasties. His campaigns elevated the world of Gidrim from obscurity to dominance over multiple star systems. However, Zahndrekh’s mind became ensnared in the past due to damage suffered during the Great Sleep, rendering him a visionary of ancient Wars of Secession. In his mind’s eye, he relentlessly quashes rebellious factions, while treating enemy commanders as esteemed captives.
Despite Zahndrekh’s altered perspective, his unparalleled abilities and equipment equip him to confront any adversary’s challenge. Bestowing unique rules upon fellow Necron units and negating special rules from foes, Zahndrekh also boasts robust defenses and remarkable resilience. If that isn’t enough to vex opponents, his ability to unleash powerful energy bolts certainly seals the deal.
What’s in the Nemesor Zahndrekh box
- x3 resin components that make one Nemesor Zahndrekh.
- x1 Citadel 25mm round base.
How to paint the Nemesor Zahndrekh set
- Step 1: Prime Your Model
Begin by applying a thin coat of primer to your Nemesor Zahndrekh miniature. Chaos Black primer is a good choice, as it creates a solid base for your paint layers. - Step 2: Base Coat – Armor and Cloak
Use Leadbelcher to paint Zahndrekh’s armor and cloak. Ensure even coverage, as this will serve as the foundation for further layers. - Step 3: Shade – Armor and Cloak
Apply Nuln Oil shade to the armor and cloak areas. This shade adds depth and contrast to the model. - Step 4: Layer – Armor and Cloak
Use Ironbreaker to layer the armor and cloak, leaving the shaded areas untouched for contrast. Follow up with Stormhost Silver for the final layer, highlighting raised areas to achieve a metallic sheen. - Step 5: Details – Crown, Shoulder Pads, and Weapon
Paint Zahndrekh’s crown and shoulder pads with Screaming Bell. This metallic color adds visual interest to these elements. Use Moot Green to paint the scythe blade, eyes, and other small details, bringing them to life. - Step 6: Wash – Details
Apply Nuln Oil wash over the crown, shoulder pads, and weapon details. This will emphasize the sculpted details and add shadows. - Step 7: Fine Details – Orb and Glyphs
Use Abaddon Black to carefully paint the orb and various glyphs on Zahndrekh’s armor. This step requires precision, but it enhances the model’s intricate design. - Step 8: Basing
Turn your attention to the base. Consider using Astrogranite texture paint for a sturdy foundation. Once dry, dry brush the base with Ushabti Bone to add texture and depth. You can also add small rocks or debris for added realism. - Step 9: Weathering – Optional
To create a weathered look, apply Typhus Corrosion or Ryza Rust to select areas on Zahndrekh’s armor and weapon. This step adds a touch of realism and character. - Step 10: Varnish
Preserve your work by applying a coat of Munitorum Varnish Spray. This protective layer keeps your painted model safe from wear and tear.

