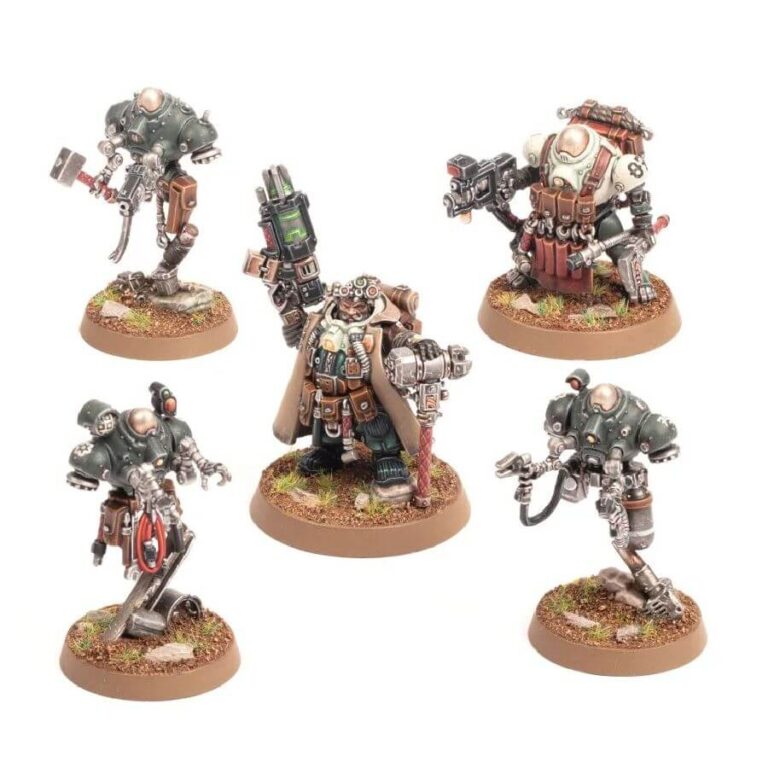
Step into the world of innovation with the Brôkhyrs, the artisans and engineers who drive the Leagues to greatness. Among them, the Iron-masters stand as exemplars of their craft, wielding unparalleled prowess. On the battlefield, they embrace the responsibility of maintaining battle-scarred Kin war engines, often joined by Ironkin and COG repair crews. These seasoned Brôkhyrs bring not only their expertise but also their most formidable creations, savoring the thrill of unleashing them upon their adversaries.
Crafted from multipart plastic, this kit assembles a Brôkhyr Iron-master, a field engineer of distinguished rank, accompanied by an entourage. Armed with a graviton rifle and their own invention, the graviton hammer, the Iron-master’s void-suit showcases their technological expertise through the array of tools adorning it. A dedicated Ironkin Assistant carries supplementary hardware, including a las-beam cutter. Additionally, three E-COGs hover alongside, each equipped with specialized tools – a plasma torch, manipulator arms, and an Autoch-pattern bolt pistol. To further enhance their capabilities, the Iron-master sports a versatile multispectral visor that can be worn over their eyes or pushed onto their forehead.
What’s in the Brôkhyr Iron-master box
- x33 plastic components that the Brôkhyr Iron-master set.
- x1 Citadel 32mm Round base.
- x1 Citadel 28.5mm Round Base.
- x3 Citadel 25mm Round Bases.
- x1 Leagues of Votann Transfer Sheet with 555 numerals, runes, and markings for prominent Leagues.
How to paint the Brôkhyr Iron-master set
- Step 1: Base Coating Armor
Start by applying a base coat of a metallic color, like Mechanicus Standard Grey or Leadbelcher, to the Brôkhyr Iron-master’s armor. This forms the base layer for the distinctive metal appearance. - Step 2: Adding Bronze and Brass Accents
Add bronze and brass accents to the armor using colors like Hashut Copper or Balthasar Gold. Focus on details like buckles, rivets, and ornamentation to create contrast and visual interest. - Step 3: Layering on Armor
Build layers on the armor to enhance its texture. Apply a slightly lighter metallic color, such as Ironbreaker or Leadbelcher, to the raised areas. This technique adds depth and dimension. - Step 4: Leather and Cloth Elements
For leather and cloth parts, like belts and pouches, use colors like XV-88 or Rhinox Hide for a realistic texture. This adds variety to the miniature’s overall appearance. - Step 5: Shading with Washes
Apply a shade like Agrax Earthshade or Nuln Oil to the miniature, focusing on the recesses and crevices. This shading step adds depth and shadow to the details. - Step 6: Adding Skin Tones
If applicable, paint the exposed skin with a suitable flesh tone, like Cadian Fleshtone. This brings the miniature to life and adds a human touch. - Step 7: Fine Detailing
Use a finer brush to paint smaller details like the Iron-master’s face, eyes, and intricate patterns. A steady hand and a magnifying glass, if needed, can make this step easier. - Step 8: Weathering Effects
Apply weathering effects to the metallic surfaces for a battle-worn appearance. Lightly dry brush a color like Ryza Rust onto the edges to mimic wear and tear. - Step 9: Varnishing for Protection
Apply a protective varnish like Ardcoat to safeguard your work. This step preserves your efforts and gives a polished finish.

