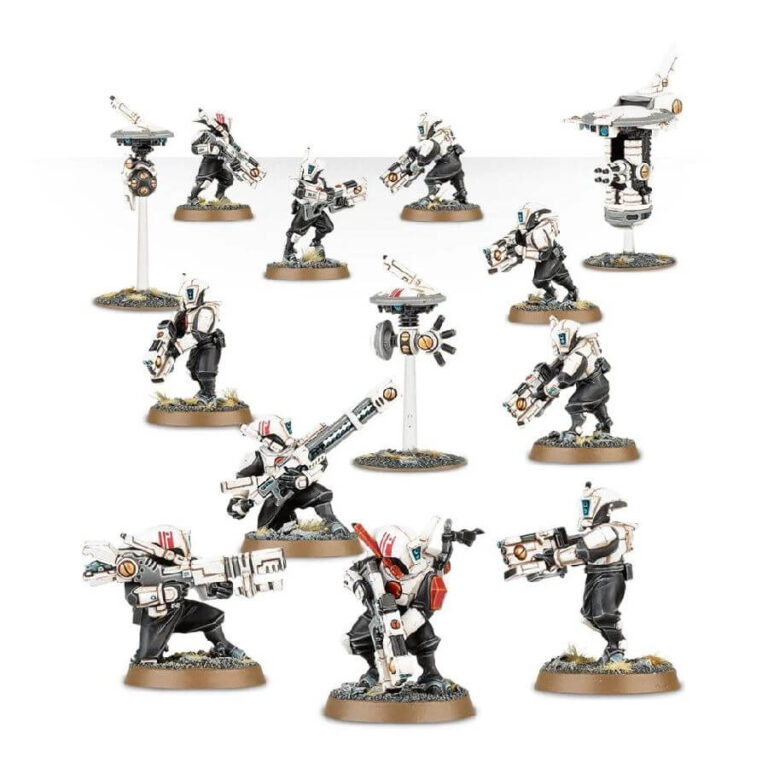
This remarkable kit houses 10 Tau Pathfinders, each a testament to adaptability. With an array of leg options encompassing kneeling, crouching, and standing stances, alongside a spectrum of head choices, customization is boundless. Clad in nimble recon armor that envelops the torso, shoulders, knees, and elbows, they bear the elegant, elongated helmets akin to those worn by Fire Warriors. Weaponry versatility defines them, with the selection including pulse carbines, rail rifles, and ion rifles.
Uncover an exceptional journey within this kit, spotlighting the awe-inspiring Recon Drone. This colossus can seamlessly integrate with a Devilfish tank (sold separately), boasting a fearsome burst cannon. The ensemble further boasts the Pulse Accelerator Drone, characterized by its unique four-pronged device beneath the circular core. Meanwhile, the Grav-inhibitor Drone stands out with its captivating orb below.
What’s in the Pathfinder Team box
- x137 plastic components that make 10 T’au Pathfinders, a Pulse Accelerator Drone, a Grav-inhibitor Drone and a Recon Drone.
- x10 Citadel 25mm Round bases.
- x3 Citadel 32mm flying bases.
How to paint the Pathfinder Team set
- Step 1: Base Coating Armor in White
Start by applying a base coat of white to the armor of the Pathfinder Team. This provides a clean canvas for the subsequent layers of color. Use a shade like White Scar for this step. - Step 2: Base Coating Clothing in Black
Next, apply a base coat of black to the clothing areas of the miniatures. Use a paint like Abaddon Black for this step to create a strong contrast against the white armor. - Step 3: Adding Red and Grey Details
Add red and grey details to the clothing and accessories of the Pathfinder Team. Use colors like Mephiston Red for red accents and Mechanicus Standard Grey for grey elements. This brings diversity to the color scheme and makes the miniatures visually engaging. - Step 4: Shading
Apply shading to the miniatures to enhance depth and realism. Use a shade like Nuln Oil to accentuate creases, recesses, and corners. Apply the shade sparingly, allowing it to settle naturally in the shadows. - Step 5: Layering
Begin layering by applying a lighter color over the base coat. For the white armor, use a lighter shade like Ulthuan Grey to gently highlight raised areas. Similarly, for the black clothing, use a lighter gray like Administratum Grey to create subtle highlights. - Step 6: Weathering
Introduce weathering effects to add a battle-worn appearance. Use a sponge or brush to apply chipped paint effects on the armor and clothing using a color like Ryza Rust. This technique mimics wear and tear on the surfaces. - Step 7: Final Highlights
Apply final highlights to bring out the details. Use even lighter shades than before, such as Wrack White for the white armor and Celestra Grey for the black clothing. This step enhances the visual appeal of the miniatures. - Step 8: Adding Small Details
Focus on smaller details like pouches, straps, and insignias. Use colors like Bugman’s Glow for pouches and Mephiston Red for small accents. These touches contribute to the overall intricacy of the miniatures. - Step 9: Basing
Consider the base of your Pathfinder Team. Apply a textured paint like Astrogranite Debris or Stirland Mud to create a realistic terrain effect. This adds depth to the miniature and ties it to the environment. - Step 10: Varnishing for Protection
Apply a protective varnish like Ardcoat to safeguard your work. This step not only preserves your efforts but also imparts a subtle sheen to the miniatures.

