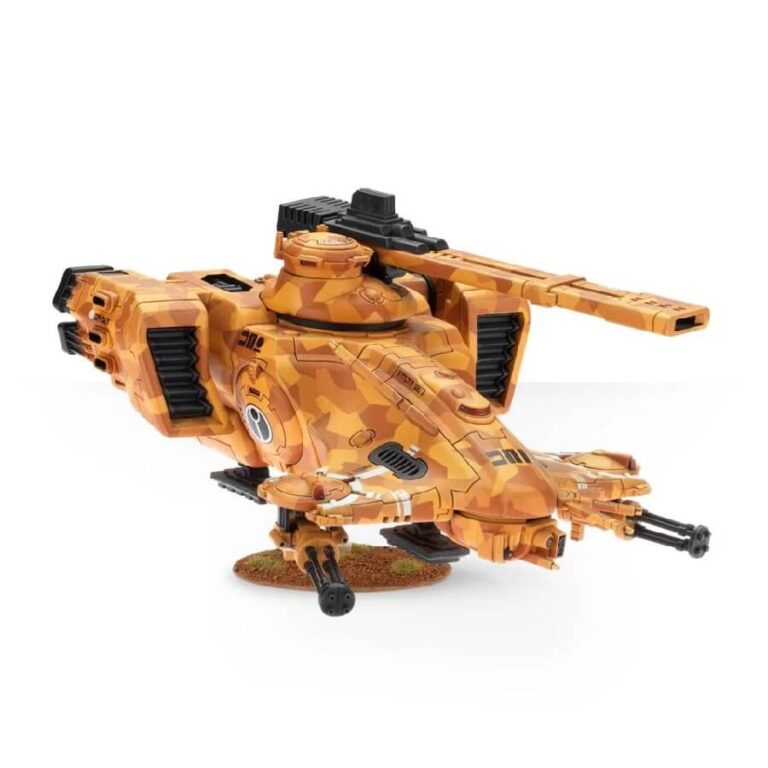
The Hammerhead Gunship kit is a true masterpiece and a centerpiece worthy of any T’au Empire collection. Notable for its unique design, the laterally extended nose captures attention, allowing for the addition of a pair of deadly burst cannons or smart missile systems. As the sleek panels curve upward, they converge into a wider body that houses the fearsome turret-mounted gun. Prepare for awe-inspiring battles as you choose between the mighty railgun or ion cannon, both capable of swiveling in different directions to strike at the heart of the enemy.
The Hammerhead Gunship is not just powerful but versatile as well. With its two vectored engines, it can tilt at various angles, granting it unparalleled mobility on the battlefield. For even deadlier assaults, the kit also includes optional weapon upgrades in the form of potent seeker missiles.
What’s in the Hammerhead Gunship box
- x88 plastic components that make either a Hammerhead Gunship or a Sky Ray Gunship.
- x1 T’au transfer sheet.
- x1 Citadel 60mm flying base.
How to paint the Hammerhead Gunship set
- Step 1: Basecoat the Body
Begin by applying the base color to the body of the XV-88 Gunship using XV-88. Use a medium-sized brush and make sure to cover the surface evenly with the paint. - Step 2: Camouflage Pattern
To create a modern camo pattern, use Ungor Flesh and Tau Light Ochre to paint irregular shapes and lines across the body. These shapes should be smaller and different in size and direction. The goal is to create a camouflage effect, so the patterns don’t need to be symmetrical. - Step 3: Apply Agrax Earthshade
After the camouflage pattern has dried, apply Agrax Earthshade wash over the entire body of the gunship. The wash will settle into the recesses and crevices, adding depth to the camo pattern and creating shading. - Step 4: Paint the Details
Using Abaddon Black, carefully paint the small details such as vents, gun barrels, and other intricate parts of the gunship. Use a fine-tipped brush for better precision. - Step 5: Add White Scar Details
With White Scar, add some small highlights or details to the edges of the camo shapes. This will give the pattern a more defined and realistic look. - Step 6: Paint Red Details
Finally, paint small details like lenses or markings for the weapons using a red color of your choice. You can use Mephiston Red or Evil Sunz Scarlet for this step. - Step 7: Varnish (Optional)
If you want to protect the paint job and give it a nice finish, you can apply a varnish coat. A matte varnish is recommended for a natural look without any unwanted shine. - Step 8: Paint the Base and Add Terrain
To complete the look of the XV-88 Gunship, paint the base using a combination of Moot Green and Steel Legion Drab for grassy areas, or Mechanicus Standard Grey or Eshin Grey for rocky terrain. Once the base colors are applied, add grass tufts or static grass using Citadel PVA glue, and place small rocks or pebbles to create a natural environment.

