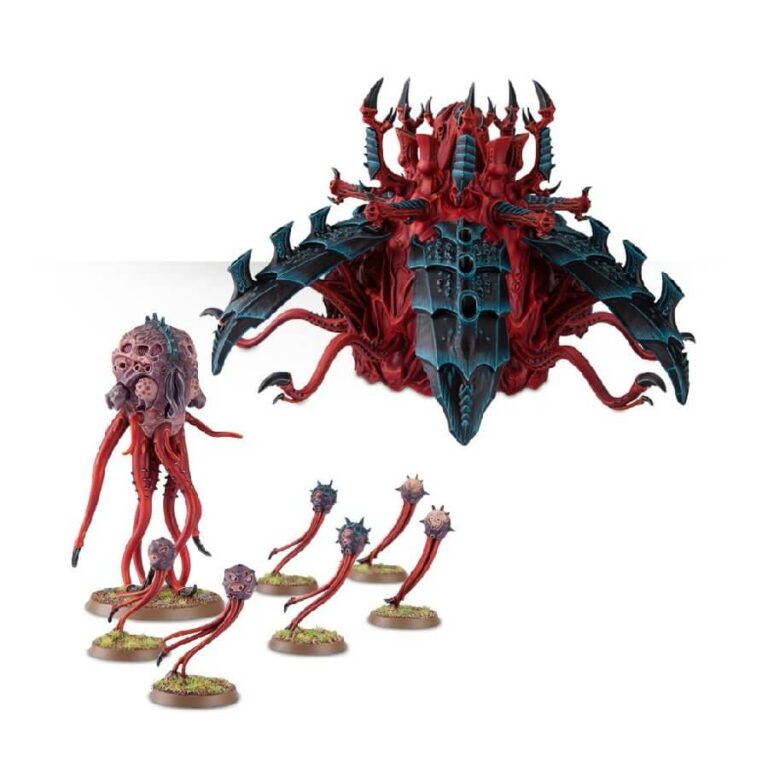
The Sporocyst is a fearsome Tyranid organism that leaves a lasting impact upon planetfall. With its chitinous shell, it burrows into the ground like a parasitic tick, ready to unleash its devastating payload. Once embedded, the Sporocyst releases clouds of polluting microorganisms, altering the planet’s atmosphere to make it ripe for digestion.
Accompanying the Sporocyst are the swift and lethal Mucolid Spores. These airborne entities move with incredible speed, detonating with deadly force upon reaching their target. Their ability to obstruct enemy flyers makes them a formidable threat on the battlefield. Prepare to wield the power of these relentless organisms and leave a trail of destruction in your wake!
What’s in the Sporocyst and Mucolid Spore box
- x124 plastic components that make one Sporocyst and one Mucolid Spore. The Sporocyst is armed with five deathspitters which can be replaced by barbed stranglers or venom cannons. The kit also comes with enough pieces to build 6 Spore mines. This kit can alternatively be built as a Tyrannocyte.
- x6 Citadel 25mm round bases.
- x1 Citadel 100mm round base.
- x1 Citadel 40mm round base.
How to paint the Sporocyst and Mucolid Spore set
- Step 1: Prime the Miniatures
Before starting to paint, it’s essential to prime your Sporocyst and Mucolid Spores with a suitable primer. A black or grey primer works well for these models. Priming creates a smooth surface for the paint to adhere to, making the painting process easier and ensuring better color coverage. - Step 2: Basecoat the Sporocyst
Using a fine brush, begin painting the carapace of the Sporocyst with a black paint like Abaddon Black. Take care to reach all the crevices and intricate details of the model. Multiple thin coats are preferable to achieve a smooth, even finish. Be patient, and let each coat dry before applying the next. - Step 3: Basecoat the Flesh
Moving on to the fleshy parts of the Sporocyst, use Mephiston Red to create a solid basecoat. Avoid getting red paint on the black carapace by using a steady hand and a smaller brush for more precise application. Thin layers work best to avoid obscuring the details. - Step 4: Basecoat the Mucolid Spores
For the Mucolid Spores, cover their bodies with Rakarth Flesh. This will serve as the starting point for their color. Carefully paint each spore, and you can use the tip of your brush for the smaller details. - Step 5: Paint the Tentacles
With Evil Sunz Scarlet, carefully paint the tentacles of the Mucolid Spores, adding vibrant red accents. Take your time to ensure the tentacles look dynamic and visually appealing. - Step 6: Shade the Miniatures
Now, apply Nuln Oil wash over the entire Sporocyst and the Mucolid Spores. This will add shading and depth to the models by settling into the recesses, enhancing the shadows and defining the details. Allow the wash to dry thoroughly before moving on to the next step. - Step 7: Highlight the Carapace
Using Mechanicus Standard Grey, carefully highlight the edges and prominent areas of the Sporocyst’s carapace. This will create definition and make the carapace stand out more. Take your time and use a fine brush to achieve clean highlights. - Step 8: Highlight the Flesh
With Pallid Wych Flesh, carefully highlight the fleshy parts of the Sporocyst, adding a lighter tone to the red. Focus on raised areas and edges to create a natural highlight effect. - Step 9: Layering
For the Sporocyst, consider using Ulthuan Grey to layer over the Mechanicus Standard Grey highlights. This will add a smoother transition and make the carapace look more polished and detailed. - Step 10: Final Touches
Add any additional details you want, such as eyes, markings, or other intricate elements using appropriate colors. This is where you can get creative and add unique touches to your models. Consider using bright colors for eyes to make them stand out.

