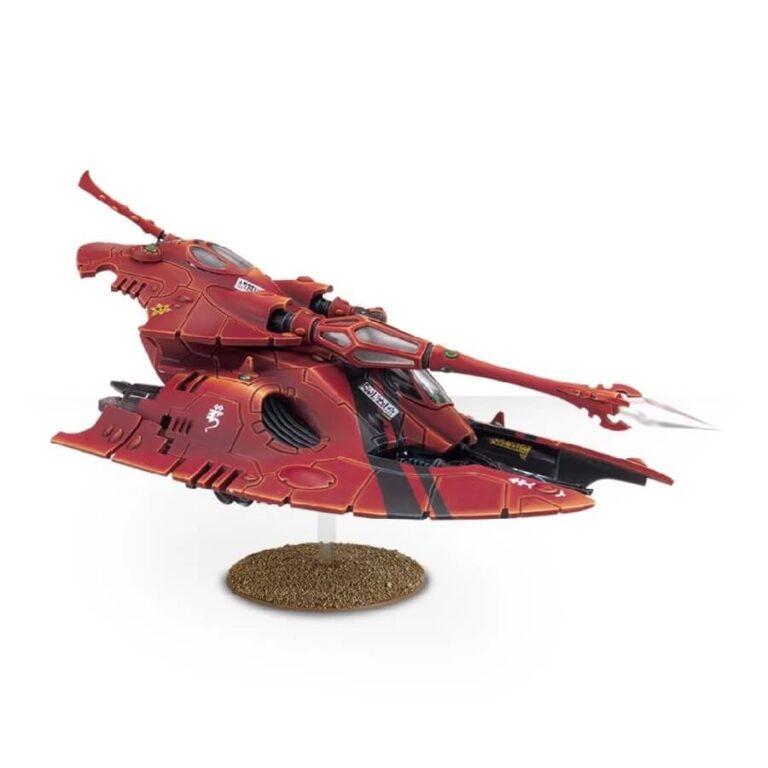
This large and sleek model serves as a captivating centerpiece in any Aeldari collection. Featuring two cockpits, one on the turret housing the powerful prism cannon and the other on the main body of the tank, the Fire Prism exudes both an imposing and elegant presence. At the heart of the long prism cannon, pentagonal frames encase opaque plastic, adding to its unique design. The vehicle’s appearance is further enhanced by sleek panels, curved grills, gemstones, and prominent engines positioned towards the rear of the model. Prepare to unleash the devastating power of the Fire Prism upon your foes as it becomes an integral part of your Aeldari forces on the battlefield.
What’s in the Fire Prism box
- x64 plastic components with which to make an Aeldari Fire Prism or a Night Spinner.
- x1 Citadel 60 mm flying base.
- x1 Aeldari Vehicle water-slide transfers.
How to paint the Fire Prism set
- Step 1: Basecoat the Hull Red
Start by applying a basecoat of red paint to the Fire Prism’s hull. Choose a vibrant red color like Mephiston Red or Evil Sunz Scarlet to cover the entire hull. Ensure you paint all the surfaces evenly for a smooth and consistent look. - Step 2: Paint the Weapons Black
Next, focus on the prism cannon and other weapons. Use a black paint like Abaddon Black to cover these parts, creating a dark and striking contrast to the red hull. - Step 3: Add Metallic Details
For metallic details such as the engine parts and other accents, use a metallic color like Leadbelcher or Runefang Steel. These shades will add a touch of realism and sophistication to the model. - Step 4: Highlight the Hull
After the basecoat has dried, apply a lighter red color like Wild Rider Red to highlight the raised areas of the hull. This will add depth and visual interest to the model. - Step 5: Highlight the Weapons
Using a lighter shade of black like Eshin Grey or Mechanicus Standard Grey, highlight the edges of the weapons. This will make them stand out and appear more defined. - Step 6: Paint Gemstones and Iconography White
For gemstones and other intricate details, use a white paint like White Scar or Corax White. This will create a striking contrast against the red hull and add an element of elegance to the model. - Step 7: Detail the Prism Cannon
The prism cannon’s pentagonal frames can be painted with opaque colors like Caledor Sky or Altdorf Guard Blue. This will give them a mysterious and captivating appearance. - Step 8: Add Final Details
Focus on any remaining details, such as additional iconography, gem highlights, or other decorations. Use appropriate colors to complement the overall appearance. - Step 9: Varnish (Optional)
For added protection and to maintain the model’s appearance, consider applying a layer of varnish. A matte varnish will provide a non-shiny finish, while a gloss varnish will enhance the model’s vibrancy.

