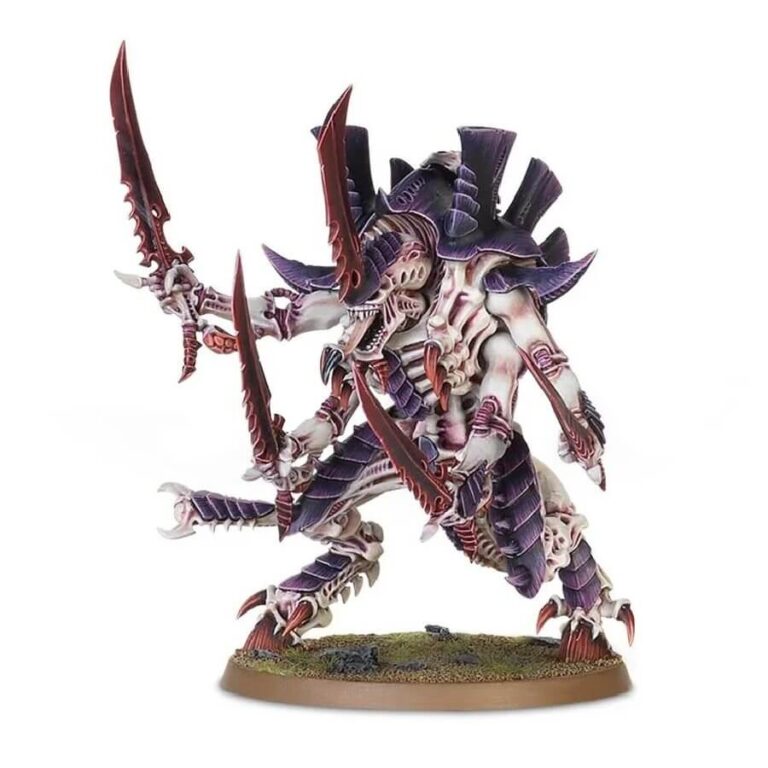
The Swarmlord, an ancient and apex creature among the Tyranids, represents the pinnacle of the Hive Tyrant bioform. With a terrifying presence, it has ravaged empires and witnessed the demise of entire civilizations.
This multipart plastic kit allows you to assemble one Swarmlord, a unique and awe-inspiring leader-beast, tailored to command your swarm. As the imposing centerpiece of your Tyranid army, it showcases a chitinous shell adorned with chimneys, a snarling head boasting a vicious bladed horn, and four serrated bone sabres – the Swarmlord’s distinctive close combat weapons. Unleash the Swarmlord’s dominion upon the battlefield and lead your Tyranid swarm to victory!
What’s in the The Swarmlord box
- x59 plastic components that make 1 Swarmlord. Additionally, you have the flexibility to build this kit as a Hive Tyrant or Winged Hive Tyrant, providing you with various tactical options to tailor your army’s composition.
- x1 Citadel 60mm Round Base.
How to paint the The Swarmlord set
- Step 1: Basecoat the Carapace
Start by applying a basecoat of Naggaroth Night to the carapace of The Swarmlord. Use a medium-sized brush to cover the entire carapace area evenly with the paint. The dark purple hue will provide a menacing and formidable look to the creature. - Step 2: Shade the Carapace
To add depth and shadow to the carapace, use Druchii Violet shade. Dip a small brush into the shade and carefully apply it to the recessed areas of the carapace. This will create a more three-dimensional effect and give the carapace a dark and eerie appearance, as if shrouded in shadows. - Step 3: Paint the Flesh
Next, paint the flesh of The Swarmlord using Rakarth Flesh. Use a brush with fine bristles to ensure smooth and even coverage. The pale flesh tone will contrast beautifully with the dark carapace, giving the model a sinister and otherworldly presence. - Step 4: Shade the Flesh
To enhance the definition of the flesh, apply Reikland Fleshshade over the Rakarth Flesh basecoat. Use a brush with a fine tip to carefully apply the shade to the recessed areas of the flesh. This will add depth and bring out the details of the Swarmlord’s body, making it appear more organic and lifelike. - Step 5: Highlight the Flesh
Use White Scar to highlight the raised areas of the flesh, such as the edges of muscles and prominent features. Take a small brush and gently apply the white paint to create subtle highlights. This will make the flesh look more textured and give the Swarmlord a more dynamic and visually striking appearance. - Step 6: Paint the Blades and Details
For the blades and other details on The Swarmlord, use Wazdakka Red. Take your time and use a brush with a fine tip to carefully paint the blades, claws, and any other red details on the model. The intense red color will add a sense of danger and aggression to the Swarmlord’s arsenal. - Step 7: Layer the Blades
To make the blades pop even more, layer Wild Rider Red over the Wazdakka Red. Use a small brush and apply this brighter red color to the edges of the blades and other red details. This technique will create a gradual transition from the darker basecoat to the vibrant top layer, adding depth and visual interest to the model. - Step 8: Add Details
For other small details, like teeth, eyes, or claws, use Abaddon Black. A fine-tipped brush will allow you to carefully paint these features, making them stand out against the lighter colors of the model. The strong contrast will give the Swarmlord a fierce and menacing look. - Step 9: Additional Shading and Highlighting
For those who want to take their painting to the next level, feel free to add extra shading or highlighting using other suitable colors. For example, you can use a light gray or blue for additional highlights on the carapace or a darker red for deeper shading on the blades. This advanced technique will further enhance the model’s depth and make it truly stand out on the tabletop.

