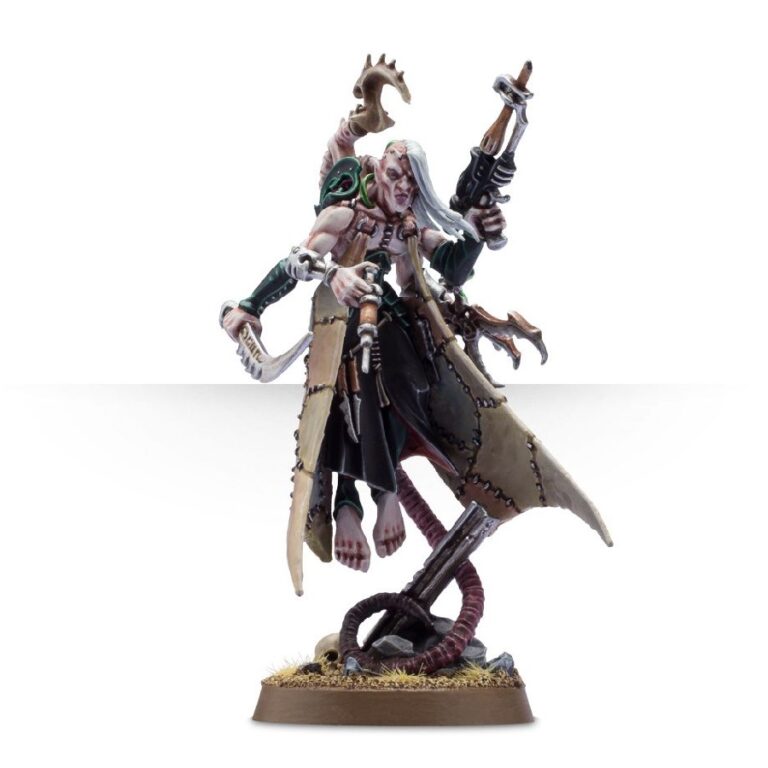
Welcome to the eerie domain of the Haemonculi, the deranged flesh-sculptors dwelling in Commorragh’s murky depths. These dark eldar alchemists are master torturers and poisoners, possessing the ability to defy death itself. Through their twisted artistry, they transform victims into obscene horrors crafted from flesh and bone, becoming invaluable assets in the brutal wars of realspace. Witness their mastery in torture, poisoncraft, and dark alchemy as they weave a haunting tapestry of pain and suffering in Commorragh’s shadowy realm.
What’s in the Haemonculus box
- x11 plastic components that make one Haemonculus, equipped with an array of deadly surgical instruments and a splinter pistol. His body is born aloft by a grotesquely elongated spine, as he drifts across the field of battle with a macabre elegance, gifting a slow and painful death to all those who cross its path.
- x1 Citadel 25mm Round Base.
How to paint the Haemonculus set
- Step 1: Prime Your Haemonculus
Begin by priming your Haemonculus model with a light grey or white primer. This will create a clean canvas for the white flesh tones and rusted metal you will be painting. - Step 2: Basecoat the White Flesh
Using a medium-sized brush, apply a base coat of White Scar to the flesh areas of your Haemonculus. Be patient and apply multiple thin coats for smooth and even coverage. - Step 3: Add Shadows
To add depth to the white flesh, use a small brush to apply a wash of Agrax Earthshade to the recessed areas. This will create shadows and make the details stand out. - Step 4: Highlight the Flesh
With a fine-tip brush, add highlights to the raised areas of the flesh using Pallid Wych Flesh or a similar off-white color. This step will create a more realistic and three-dimensional look to your Haemonculus. - Step 5: Paint the Rusted Metal
For the rusted metal parts of your Haemonculus, base coat them with Rhinox Hide or a similar dark brown color. This will serve as the base for the rusted effect. - Step 6: Add Rust
Using a sponge or a small stippling brush, dab on Ryza Rust or a similar orange-brown color to create a rusted texture. Focus on edges, corners, and areas where rust would naturally form. - Step 7: Highlight the Metal
To add highlights to the metal areas, use Ironbreaker or a similar metallic silver paint. Apply this sparingly to the raised edges of the metal parts to give them a worn and weathered appearance. - Step 8: Paint Details
Using a fine-tip brush, carefully paint the intricate details of your Haemonculus, such as the eyes, blades, and other accessories. For the eyes, consider using Incubi Darkness as the base color, for the green details, Warpstone Glow is a good option, and for the blades, use Leadbelcher as the base color, and then apply a thin line of Runefang Steel to create a sharp edge. Feel free to experiment with different colors to add character and personality to your Haemonculus. - Step 9: Final Touches
Take a moment to inspect your Haemonculus model and make any necessary touch-ups or corrections. Ensure that the colors are neat and well-defined for a polished finish. - Step 10: Varnish for Protection
To protect your hard work and preserve the paint job, apply a varnish over the entire model. This will keep your Haemonculus looking great and ready for display or tabletop battles.

