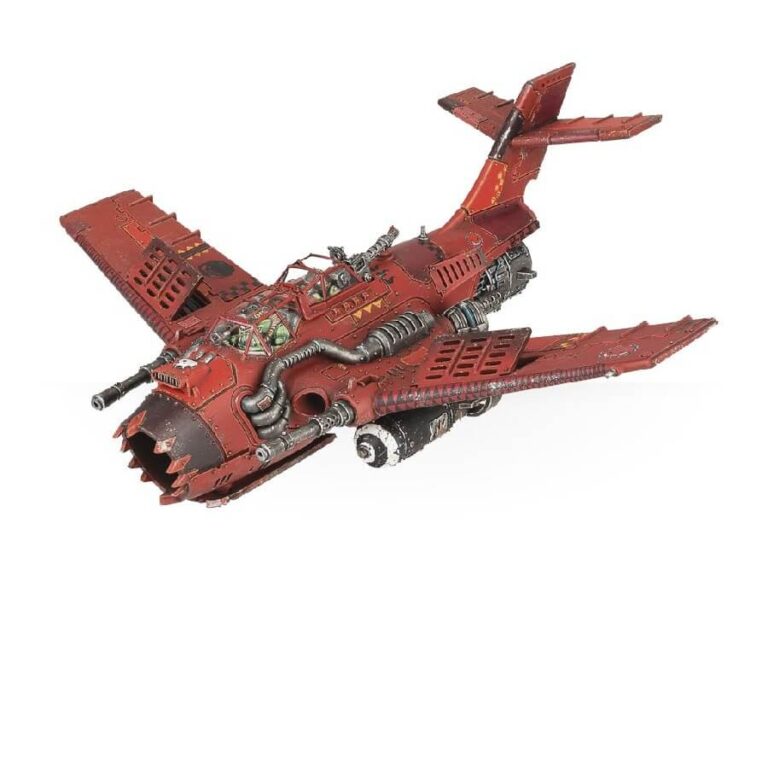
The Blitza-Bommer is the aircraft of choice for the bravest (or some might say most unhinged) Ork pilots. These daredevil pilots take aim by diving straight at their targets, releasing their explosive Boom Bomb at the very last moment for maximum impact. Once the chaos has erupted (hopefully without involving themselves), they unleash a devastating barrage from a pair of super shootas, ensuring that no stray or squishy targets are left standing. It’s a true spectacle of destruction!
What’s in the Blitza-Bommer box
- x172 plastic components that make one Blitza-Bommer. As well as a Grot Gunner, it includes a range of weapons options: a big shoota, boom bombs, burna bombs, skorcha rokkits and supa shootas.
This plastic kit can also be assembled as a Dakkajet, Burna-Bommer or Wazbom Blastajet. - x1 Ork transfer sheet.
- x1 flying stem.
- x1 Citadel 120x92mm Oval base.
How to paint the Blitza-Bommer set
- Step 1: Basecoat the Hull
Using a medium-sized brush, apply a solid basecoat of Mephiston Red to the entire hull of the Blitza-Bommer. Ensure smooth and even coverage, taking care to reach all the nooks and crannies. - Step 2: Shading
Apply a shading wash, like Carroburg Crimson, to add depth and definition to the red hull. Use a fine detail brush to carefully apply the wash in the recessed areas, allowing it to flow and settle naturally. - Step 3: Highlight the Hull
Once the shading wash has dried, use a lighter shade of red, such as Evil Sunz Scarlet, to highlight the raised areas of the hull. Use a fine detail brush to pick out edges, panels, and other prominent features, creating a subtle contrast and adding depth. - Step 4: Paint the Cockpit and Canopy
Using Leadbelcher, paint the metal parts of the cockpit and canopy. For the interior, use Abaddon Black or a dark grey color like Mechanicus Standard Grey. Add small details like control panels or dials with appropriate colors. - Step 5: Detail the Engine and Exhausts
Paint the engine and exhaust areas with metallic paints like Runefang Steel or Ironbreaker to give them a metallic sheen. You can also add touches of color to represent heat effects or fuel leaks using colors like Averland Sunset, Troll Slayer Orange, or Khorne Red. - Step 6: Add Glyphs and Markings
Using a fine detail brush, paint glyphs, symbols, or squad markings on various parts of the Blitza-Bommer. You can use colors like White Scar, Yriel Yellow, or Abaddon Black for this step, depending on your preferred design. - Step 7: Weathering and Battle Damage
Apply weathering effects to give the Blitza-Bommer a battle-worn appearance. Use a dry brush technique with a light brown color like Zandri Dust or a grey color like Administratum Grey to lightly brush over edges and exposed surfaces. You can also create small scratches or bullet holes using a fine detail brush and Abaddon Black or Eshin Grey. - Step 8: Final Details and Varnish
Add any final details, such as painting canopies or windows with a glossy finish using Ardcoat to simulate glass, or applying decals for additional markings or symbols. Once you are satisfied with the paint job, apply a matte varnish like Munitorum Varnish to protect the paintwork and provide a uniform finish.

