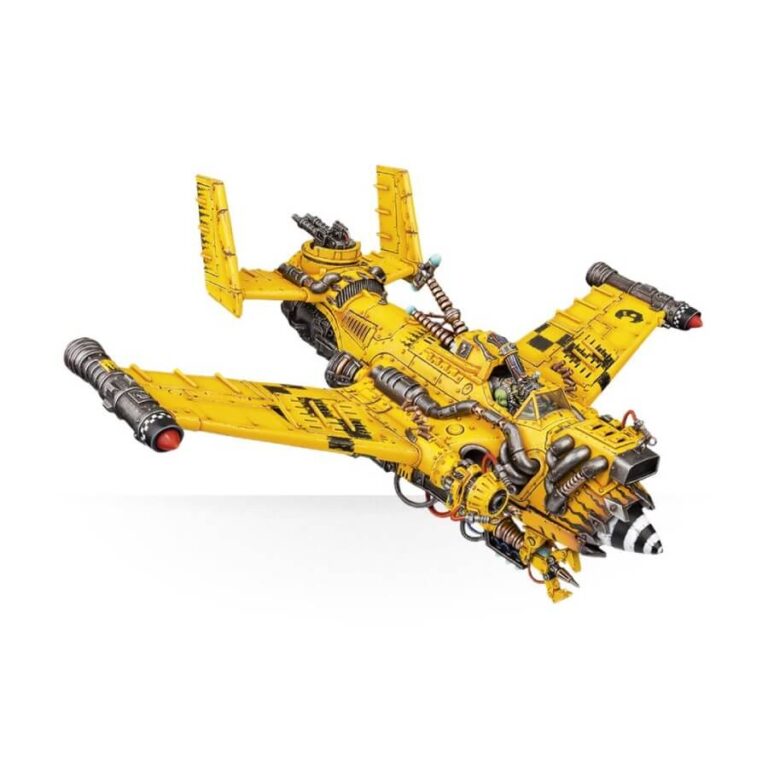
Prepare yourself for the ultimate fusion of Ork obsessions: speed, dakka, explosions, and the mighty “WAAAGH!” Introducing the Wazbom Blastajet, a mind-boggling contraption that embodies the sheer madness and ferocious firepower of the Orks. Piloted by the wildest Mekboyz, these improvised flying machines soar through the skies, unleashing a torrent of improbable weaponry upon their unsuspecting targets. Flying in tightly packed formations, these shooty jets engage in a raucous competition to achieve the most hilarious and destructive outcomes. Whether enemies are disintegrated by searing energies, teleported into oblivion, or sent hurtling through the air to meet their messy demise, every kill fuels the insatiable desire of the Mekboyz to gather up the resulting scrap and proudly adorn their Blastajet skwadrons. Get ready for an exhilarating, explosive, and downright entertaining aerial onslaught like no other!
What’s in the Wazbom Blastajet box
- x172 plastic components that make one Wazbom Blastajet, that uniquely Orky screaming skyborne destroyer. Absolutely bristling with detailed weaponry, the jet can be armed with a twin-linked kustom mega-kannon (or optional tellyport mega-blasta), underslung smasha gun, stikkbomb flinga (or optional kustom force field) and gitbusta turret!
This plastic kit can also be assembled as a Burna-Bommer, a Blitza-Bommer, or a Dakkajet. - x1 Ork transfer sheet.
- x1 flying stem
- x1 Citadel 120x92mm Oval base
How to paint the Wazbom Blastajet set
- Step 1: Basecoat the Hull
Start by applying a solid basecoat to the hull of the Wazbom Blastajet. A vibrant Ork color like Flash Gitz Yellow works well for this step. Make sure to cover the entire surface evenly using a medium-sized brush or airbrush. - Step 2: Detail the Metal Parts
Use a metallic paint, such as Leadbelcher, to paint the metal parts of the Blastajet. This includes the engine, exhaust pipes, and weaponry. Take your time and apply the paint carefully to capture the metallic sheen. - Step 3: Paint the Ork Symbols
Choose a contrasting color, like Evil Sunz Scarlet, to paint the Ork symbols and glyphs on the Blastajet. This step adds character and makes the model distinctively Orky. Use a fine detail brush for precise application. - Step 4: Weathering Effects
Add weathering effects to the hull to give the Blastajet a worn and battle-hardened look. Drybrushing with a lighter color, such as Baneblade Brown, will create the effect of chipped paint and wear. Focus on raised edges and areas prone to damage. - Step 5: Highlight the Metal Parts
Use a lighter metallic shade, such as Ironbreaker, to highlight the edges and prominent areas of the metal parts. This step adds depth and definition to the details, making them stand out. - Step 6: Cockpit and Interior Details
Pay attention to the cockpit and interior details of the Blastajet. Paint the pilot’s seat with a vibrant color like Mephiston Red, and use Averland Sunset for control panels. Add touches of Eshin Grey for the instrument dials. - Step 7: Additional Details
Consider adding additional colors and details to enhance the Blastajet’s appearance. For example, paint the engine flames with Troll Slayer Orange to create a fiery effect. Use colors like Moot Green or Macragge Blue for the weaponry to make them visually striking. - Step 8: Wash and Shade
Apply washes or shades to the recessed areas of the model to create shading and depth. Use shades like Agrax Earthshade or Nuln Oil sparingly, focusing on areas that would naturally accumulate dirt or grime. - Step 9: Varnish
Apply a matte varnish, like Stormshield, to the entire model to protect the paintwork and provide a unified finish. This step will also help to reduce shine and glare, giving the Blastajet a more realistic look.

